


|
|
|
|
|
|
|
|
|
|
|
|
|
|
|
|
|
|
Before You Begin
- The CAREWare HTTP Server generates the website for CAREWare and facilitates communication between the user’s browser and the CAREWare Business Tier. The CAREWare HTTP Server installs as a Windows Service. By default, it listens and responds to unencrypted HTTP requests on port 8080.
- If you plan to open CAREWare to the internet, HIPAA requires that the HTTP Server is configured to use a TLS certificate for encryption or have users connect securely to the internal network using a remote connection or VPN option.
- If a TLS certificate is used for CAREWare, that certificate must be an X.509 Apache-style certificate obtained from an official Certificate Authority (CA). There are many CAs that offer different levels of service with varying costs. Support for choosing a CA outside the organization’s needs is outside the scope of this document.
Install CAREWare and Test the Local Connection
Before setting up the HTTP Server, install CAREWare and test the connection as described in the instructions for installing CAREWare.
|
|
Configure the HTTP Server Settings
|
|
|
|
Step 1. In a browser other than Internet Explorer, enter http://localhost:8080/careware/rs/index.htm. The CAREWare login screen should appear.
Step 2. If there are errors, check the HTTP Server log file at C:\Program Files\CAREWare HTTP Server\cwhttp\logs by default. Also check the Business Tier log file at C:\Program Files\CAREWare Business Tier by default. If you need help identifying the problem, contact the CAREWare Help Desk.
TLS Setup Overview
If CAREWare is set up as an internet-facing application, HIPAA requires HTTP applications that communicate across the internet to encrypt their communications with TLS 1.2 or newer. The TLS protocol uses X.509 Apache-style certificates.
Obtain an X.509 Certificate
X.509 certificates come in several forms, and various tools provided by different companies and organizations can convert the certificates to different file formats. The CAREWare HTTP Server uses Apache-style certificate files, where the certificate is in one file and the private key is in another. Typically, with .crt and .key extensions. If your certificate and private key are already in the Windows Certificate Store, you can export the certificate and private key, which will give you the two files you need. If the certificate is exported as a PFX file, the certificate and key can be exported using OpenSSL by following the instructions here.
Configure the DNS, Router, and Server
X.509/TLS certificates are linked to a domain name under the organization’s control. That domain name needs to be registered in the public DNS system so that it forwards TCP traffic to the router. The default port for HTTPS/TLS is 443. The router needs to be configured to forward incoming traffic for port 443 from the public IP to the fully qualified domain name for the CAREWare HTTP Server. The Windows Firewall on the CAREWare HTTP Server needs to be configured to allow incoming traffic on port 443 as well.
Configure the CAREWare HTTP Server to Use TLS
The CAREWare HTTP Server comes with HttpSettingsTool.exe for configuring options for the website. HttpSettingsTool configures the CAREWare HTTP Server by making changes to res_admin_settings.txt, located at C:\Program Files\CAREWare HTTP Server\cwhttp\res_admin by default. When the CAREWare HTTP Server starts, it retrieves its configuration information from res_admin_settings.txt.
To configure the CAREWare HTTP Server to use a TLS certificate, follow these instructions:
Step 1. Go to the CAREWare HTTP Server utility, located at C:\Program Files\CAREWare HTTP Server by default.
Step 2. Right-click HttpSettingsTool.exe.
Step 3. Click Run as Administrator.
Step 4. For Security Choice, select Encrypt HTTP Traffic using TLS with x509 certificate.
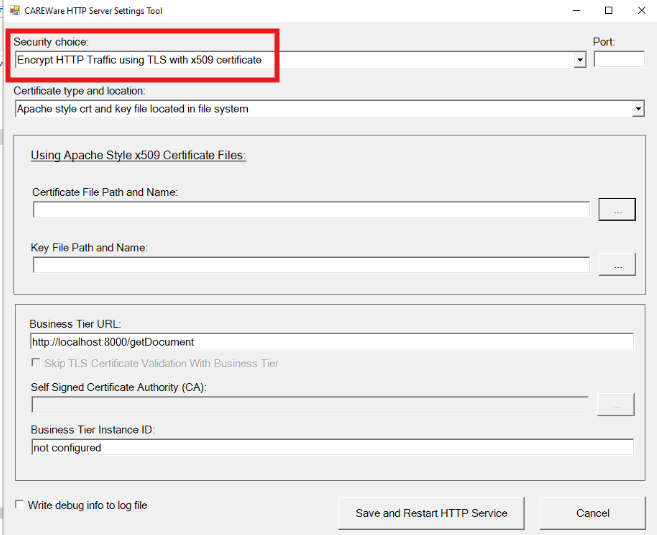
Step 5. Either leave Port blank or enter 443. If Port is blank, 443 is used by default.
Step 6. For Security type and location, select Apache style crt and key file located in file system.
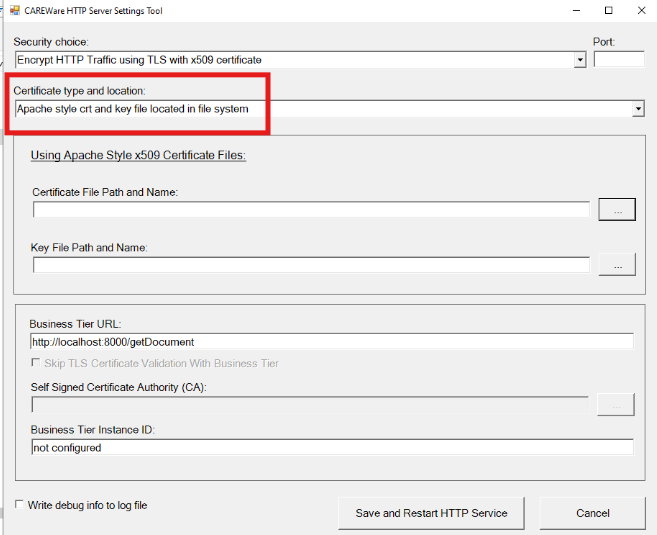
Step 7. For Certificate File Path and Name, click the ellipsis button and navigate to the certificate file.
Step 8. For Key File Path and Name, click the ellipsis button and navigate to the private key file.
Step 9. Leave Business Tier URL set to http://localhost:8000/getDocument.
Step 10. Clear Write debug info to log file.
Step 11. Click Save and Restart the HTTP Service.
How to confirm it worked
- Check today’s log file in C:\Program Files\CAREWare HTTP Server\cwhttp\logs by default. Make sure there is a log entry that reads: HTTP: communication with browsers are encrypted with TLS 1.2.
- Open a browser and enter https://yourURL/careware/rs/index.htm. Make sure the browser reports that the connection is secure.
Troubleshooting and common questions
The local connection does not open the CAREWare login screen.
Review the HTTP Server log and Business Tier log at the default locations listed above. Testing the default local connection before changing settings helps isolate configuration problems.
The secure URL does not work after TLS setup.
Confirm that DNS forwards traffic to the router, the router forwards port 443 to the CAREWare HTTP Server, Windows Firewall allows incoming traffic on port 443, and the certificate and private key paths are correct.
The browser does not report a secure connection.
Confirm that the certificate matches the domain name and comes from a trusted Certificate Authority. Then check the HTTP Server log for the TLS 1.2 encryption entry.
Related References
|
|
|
|
|
|


