


|
Purpose |
Configure CAREWare 6 to authenticate users through an OpenID Connect (OIDC) identity provider. |
|
Who should do this |
CAREWare administrators working with the organization’s identity or security administrator. |
|
Use this setup when |
CAREWare sign-in should be delegated to an OIDC provider instead of CAREWare passwords. |
|
Main warning |
Do not enable OIDC until the provider and user matching are tested. Enabling OIDC disables normal CAREWare username/password sign-in. |
|
Video walkthrough |
Quick path
|
Central Administration > Administrative Options > Advanced Security Options > OpenID Connect Configuration Settings |
Before you begin
• Coordinate the OIDC authorization URL, Client ID, Client Secret, redirect/base URL, and logout behavior with the identity provider administrator.
• Confirm CAREWare user accounts already exist and decide which OIDC claim will match each user.
• Use the Provider User Manager to review user accounts and provider access before enabling OIDC.
• Plan a recovery path using the CW Admin Utility or Common Storage if the OIDC configuration prevents sign-in.
|
Important The sub claim is the most secure matching option because it is static and unique within the identity provider. Use name or email matching only when the identity provider’s policies make those values reliable. |
Open OpenID Connect settings
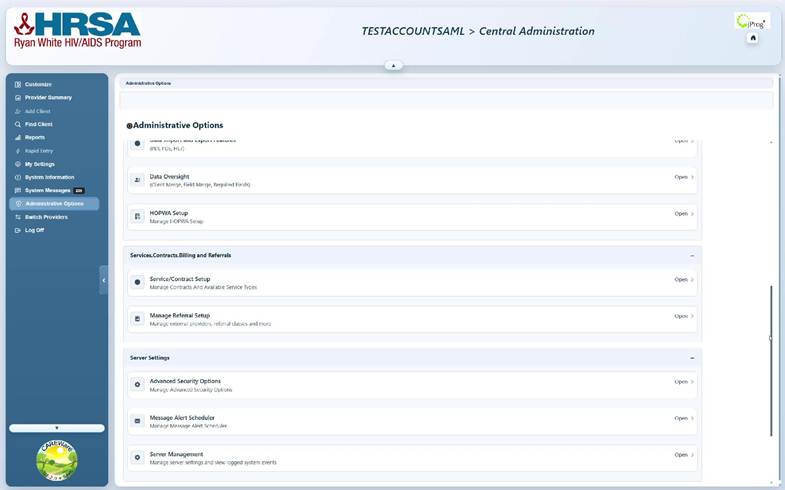
Step 1. Log in to Central Administration and click Administrative Options.
Step 2. Open Advanced Security Options.
Step 3. Click OpenID Connect Configuration Settings.
|
Tip Keep Status disabled while entering and validating configuration values. This avoids locking users out before the provider setup is complete. |
Configure CAREWare OIDC settings
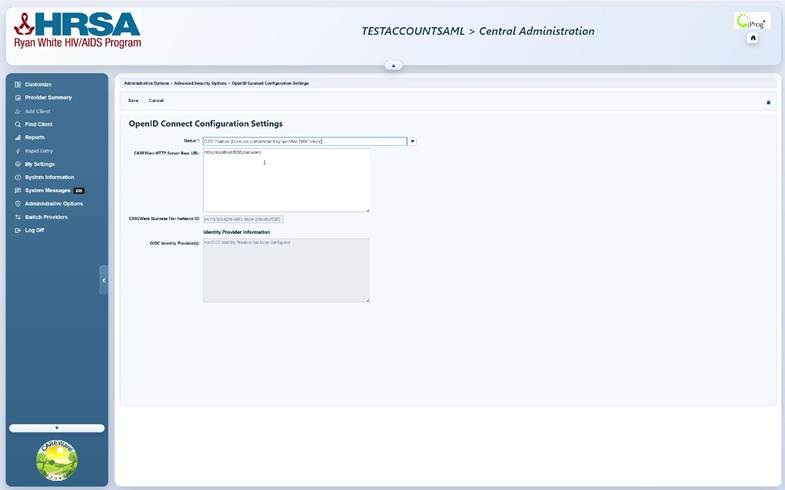
Step 4. Review Status and enter the CAREWare HTTP Server Base URL used by the identity provider to return users to CAREWare.
Step 5. Confirm the CAREWare Business Tier Instance ID shown on the page. Treat this value as read-only unless directed otherwise by CAREWare support.
Step 6. Click OIDC Identity Provider(s) to open the provider list.
|
Important The CAREWare HTTP Server Base URL must represent the CAREWare web address reachable by users and accepted by the identity provider. Coordinate any redirect URI requirement with the identity provider administrator before enabling OIDC. |
Add the OIDC identity provider
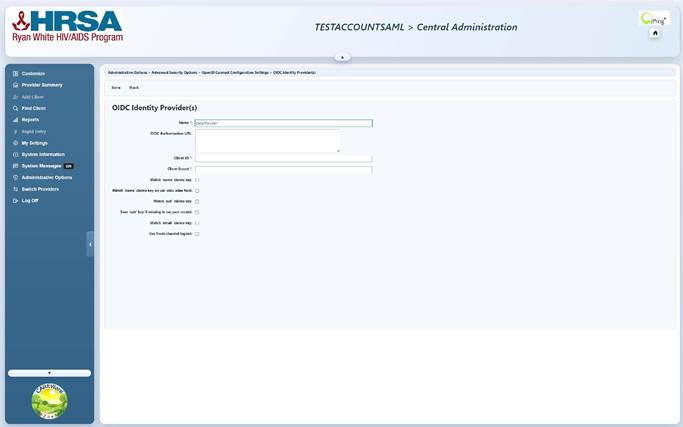
Step 7. Add or open the provider configuration.
Step 8. Enter Name, OIDC Authorization URL, Client ID, and Client Secret.
Step 9. Select the claim matching options that match the organization’s identity-provider design, then click Save.
Provider matching options
|
Option |
Use |
|
Match sub claims key |
Preferred when available. Matches the static, unique subject identifier returned by the provider. |
|
Save sub key if missing in cw_user record |
Stores the returned sub value after the user is matched by another configured field. |
|
Match name claims key |
Matches the returned name value. Use only when name cannot be changed in a way that could create an unsafe match. |
|
Match name on usr_oidc_alias |
Matches the name claim to the CAREWare user OIDC alias instead of the CAREWare username. |
|
Match email claims key |
Matches by returned email. Use only when email is managed as a stable, verified identifier. |
|
Use front-channel logout |
Use when the identity provider and CAREWare deployment support front-channel sign-out behavior. |
Prepare CAREWare users for OIDC matching
Step 10. Go to Administrative Options > Provider User Manager.
Step 11. Open Manage Active Users or Manage Users, select the user, and open User Info.
Step 12. Confirm the CAREWare username and email values that will be used for matching. If the provider is configured to match the name claim to usr_oidc_alias, maintain the user’s OIDC alias accordingly.
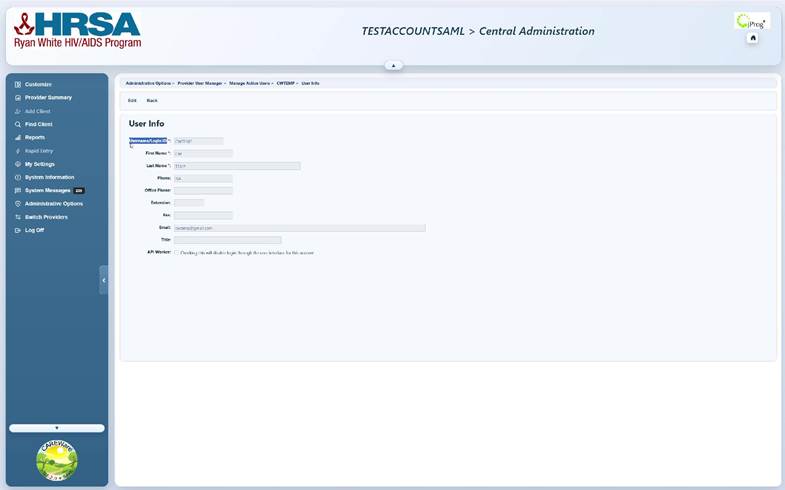
Step 13. Repeat the review for each user who must sign in through the OIDC provider.
|
Tip The Provider User Manager can manage OpenID Connect values for users as well as provider access and permissions. Verify both identity matching and the user’s assigned provider access before testing sign-in. |
Enable OIDC and restart CAREWare services
Step 14. Return to OpenID Connect Configuration Settings, set Status to OIDC Enabled, and click Save.
Step 15. Restart CAREWare in this order: stop the Business Tier, stop the HTTP Server, start the Business Tier, then start the HTTP Server.
Step 16. Use a test user to sign in through the OIDC provider and confirm that CAREWare opens the expected user account and provider access.
|
Important When OIDC is enabled, normal CAREWare username/password logins are disabled. Keep an administrator recovery method available until authentication is confirmed. |
CW Admin Utility and Common Storage recovery
If OIDC is configured incorrectly and administrators cannot sign in:
• Open the CW Admin Utility from C:\Program Files\CAREWare Business Tier and run it as Administrator.
• Stop the CAREWare Business Tier before changing server-level settings, following local change-control procedures.
• Set the Common Storage value OpenIDConnectAuthEnabled to OFF to re-enable normal sign-in, then restart the CAREWare services.
|
Warning Edit Common Storage only when necessary and record the original value before making a change. A server-level authentication setting can affect all users. |
How to confirm it worked
• The CAREWare login redirects to the single sign on login button.
• The CAREWare login page no longer displays the user name field.
• The test user returns to CAREWare without entering a CAREWare password.
• The authenticated OIDC account maps to the intended CAREWare user.
• The user can access only the providers and permissions assigned in CAREWare.
• Logout behavior matches the selected provider configuration.
Troubleshooting and common questions
Why does CAREWare open the wrong account?
Review the selected claim matching option and the corresponding CAREWare username, email, sub value, or OIDC alias. Avoid enabling more matching methods than required.
Why can no one sign in after OIDC was enabled?
Use the recovery procedure above to set OpenIDConnectAuthEnabled to OFF, restart services, correct the OIDC configuration, and retest before re-enabling it.
Why does the identity provider reject the request?
Confirm the OIDC Authorization URL, Client ID, Client Secret, and the CAREWare HTTP Server Base URL/redirect configuration with the identity provider administrator.
Related CAREWare guides and resources
|
Resource |
How it helps |
|
Instructions for setting up the CAREWare website connection |
|
|
Run the Business Tier administration utility and start or stop the service when needed. |
|
|
Manage user access, permissions, and OpenID Connect values. |
|
|
Create and maintain CAREWare user accounts and provider assignments. |


