


|
|
|
|
|
|
|
|
|
|
|
|
|
|
|
|
Why Message Queuing is Required
On any 64-bit environment, the user must turn on Microsoft Message Queuing for CAREWare to work properly. If it is not turned on, users will encounter the following error:
Source: jProgBusiness - Message Queuing has not been installed on this computer.
at System.Messaging.Interop.SafeNativeMethods.MQPathNameToFormatName(String pathName, StringBuilder formatName, Int32& count)
at System.Messaging.MessageQueue.ResolveFormatNameFromQueuePath(String queuePath, Boolean throwException)
at System.Messaging.MessageQueue.Exists(String path)
at jProgBusiness.jBusiness.jURNEncryption.GetEURN(String urn)
at jProgBusiness.jBusiness.jURNEncryption.EncryptURN(String URN)
at jProgBusiness.jBusiness.jBusinessClient.ClientAdd(String GUIDToken, jClientAdd NewClientAdd, jBusinessShared BusinessShared, Boolean
ignoreURN, String importHL7ProviderPK, Boolean skipClientPresearch)
at jProgBusiness.jBusiness.jBusinessClient.ClientAdd(String GUIDToken, jClientAdd NewClientAdd, Boolean skipClientPresearch, String
domainToImportTo)
at jProgBusiness.jBusiness.jBusinessRemote.CLN_Client_Add(String SessionToken, jClientAdd NewClientAdd, Boolean skipClientPresearch,
String domainToImportToPK)
An error occured while adding a new client to the central database. You will not be able to add a client to the central database at this time.
Install Message Queuing on Windows Server 2012 or 2016
1. Open Server Manager.
2. Click Add Roles and Features.
3. Click Installation Type.
4. Click Role-based or feature-based installation.
5. Click Next.
6. Click Features.
7. Expand Message Queuing.
8. Click Message Queuing Server.
9. Click Directory Service Integration.
10. Click HTTP Support.
11. Click Next.
12. Click Install.
Install Message Queuing on Windows Server 2008 or Windows Server 2008 R2
1. In Server Manager, click Features.
2. In the right-hand pane under Features Summary, click Add Features.
3. In the resulting window, expand Message Queuing.
4. Expand Message Queuing Services.
5. Click Directory Services Integration (for computers joined to a domain), and then click HTTP Support.
6. Click Next, and then click Install.
Install Message Queuing on Windows 7 or Windows Vista
1. Open Control Panel.
2. Click Programs and then, under Programs and Features, click Turn Windows Features on or off.
3. Expand Microsoft Message Queue (MSMQ) Server, expand Microsoft Message Queue (MSMQ) Server Core, and then select the check boxes for the following Message Queuing features:
4. MSMQ Active Directory Domain Services Integration (for computers joined to a domain).
5. MSMQ HTTP Support.
6. Click OK.
7. If you are prompted to restart the computer, click OK to complete the installation.
Enable Message Queuing using PowerShell
1. Type PowerShell in the search field.
2. Right-click PowerShell.
3. Click Run as Administrator.
To list the Message Queuing features
1. Paste this command: Get-WindowsOptionalFeature -Online | ? FeatureName -match "msmq" | select FeatureName
2. Press Enter.
To enable the Message Queuing feature
1. Paste this command: Enable-WindowsOptionalFeature -Online -FeatureName MSMQ-Container -All
2. Press Enter.
3. Paste this command: Enable-WindowsOptionalFeature -Online -FeatureName MSMQ-Server -All
4. Press Enter.
5. Paste this command: Enable-WindowsOptionalFeature -Online -FeatureName "MSMQ-HTTP" -All
6. Press Enter.
7. Paste this command: Enable-WindowsOptionalFeature -Online -FeatureName MSMQ-ADIntegration -All
8. Press Enter.
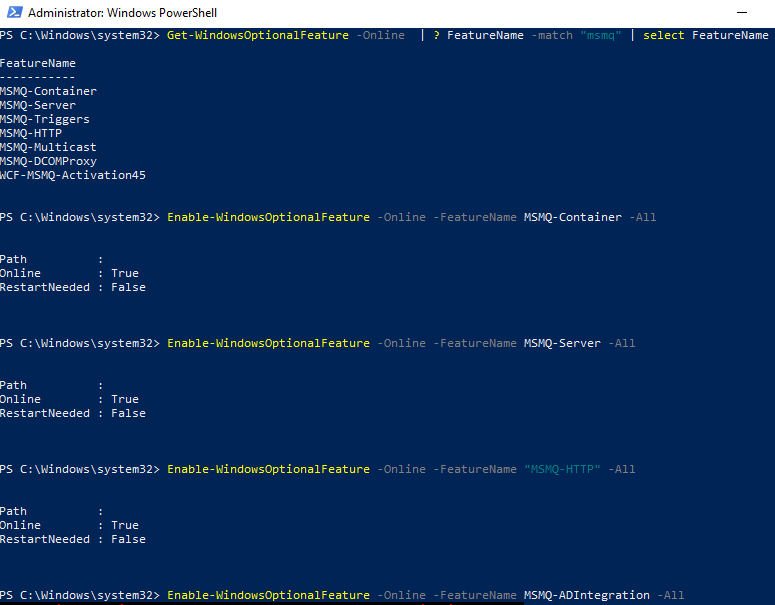
After installation
Restart the CAREWare business tier service. For instructions, see CW Admin Utility. CAREWare will not recognize the changes made to the PC or server until the service has been restarted.


