


|
|
|
Purpose |
Update the medication definitions used for medication prescription data entry. |
|
Who should do this |
CAREWare administrators or designated users with access to Clinical Setup and Medication Management. |
|
Use this guide when you need to |
Download a medication file, import medication definitions, activate medications for a provider, or assign custom medication names. |
|
Main warning |
Importing makes medications available for setup; each medication must still be activated in every provider domain where users need it. |
|
Medication file source |
|
Quick path Administrative Options > Clinical Setup > Medication Management > Medication Definitions File > Upload New Medication File. After importing: Medication Setup > select medication > Activate. |
Before you begin
- This guide covers medications used for medication prescription data entry. It does not cover the separate ADAP Medications Import file.
- You need administrative access to Clinical Setup and Medication Management. This work may be limited to CAREWare administrators or power users.
- Medication definitions can be imported from Central Administration or from a provider domain. Activation is provider-specific and may need to be repeated for each provider domain.
Workflow overview
- Download the current Medications Import file and save it where you can find it.
- Upload the file and import the medication definitions you need.
- Activate medications in each provider domain where they should be available.
- Optionally enable Custom Names and assign brand or locally preferred display names.
Download the medication file
Use the CAREWare medication files page to retrieve the current file for prescription data entry.
Step 1. Click this link CAREWare medication files
Step 2. Click Medications Import
Step 3. RIght click the downloaded zip file
Step 4. Click Extract All
Upload the medication file to CAREWare
Step 5. Click Administrative Options.
Step 6. Click Clinical Setup.
Step 7. Click Medication Management.
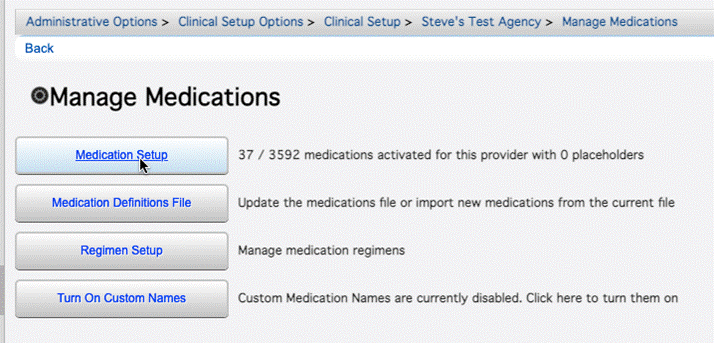
Step 8. Click Medication Definitions File.
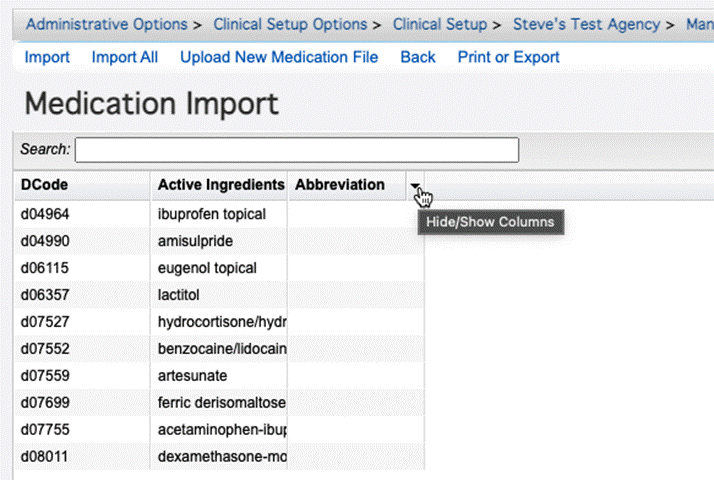
Step 9. Click Upload New Medication File, click Choose File, select the file you downloaded, and save the upload.
Step 10. Select the medication definitions you need and click Import, or click Import All to import every definition in the file.
|
Important Import All can add a very large list. Use it only when your organization intends to make the full medication file available for setup. |
Optional: identify ART medications with Ingredient Count
Step 11. On the Medication Import page, open Hide/Show Columns, select Ingredient Count, and click Save.
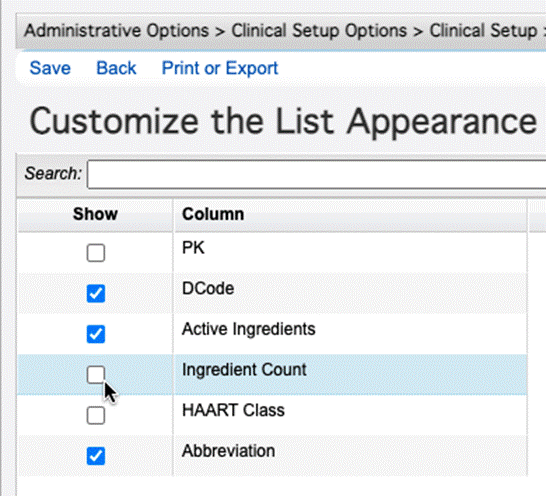
Click the Ingredient Count column header to sort it in descending order. This can help bring combination medications, including many ART entries, toward the top of the list so you can select the definitions you need.
|
Tip Importing a definition does not make it selectable in client medication data entry. Complete the activation steps in the next section. |
Medication management actions
Use this table as a quick reference while you work through the medication update process.
|
Action |
What it does |
When to use it |
|
Medication Definitions File |
Opens the medication import workflow. |
Use to upload a new medication file and import definitions. |
|
Upload New Medication File |
Lets you select the downloaded medication file. |
Use whenever a newer Medications Import file is available. |
|
Import |
Adds the selected medication definitions. |
Use when you want only specific medications. |
|
Import All |
Adds every medication in the uploaded file. |
Use only when your organization wants the full list available for setup. |
|
Medication Setup |
Opens the provider-specific activation list. |
Use to activate, deactivate, or edit medications. |
|
Activate / Activate All |
Makes selected or all medications available for data entry. |
Use carefully; activation is provider-specific. |
|
Turn On Custom Names |
Allows brand or locally preferred names to display. |
Use when ingredient names are not the preferred display text. |
|
Edit |
Opens the selected medication so you can enter a custom name. |
Use after Custom Names are enabled. |
|
Important Medication definitions and medication activation are separate stages. A medication can be imported successfully and still remain unavailable to users until it is activated for their provider domain. |
Activate medications for a provider domain
Activation controls which imported medications users can select for prescription data entry in the current provider domain.
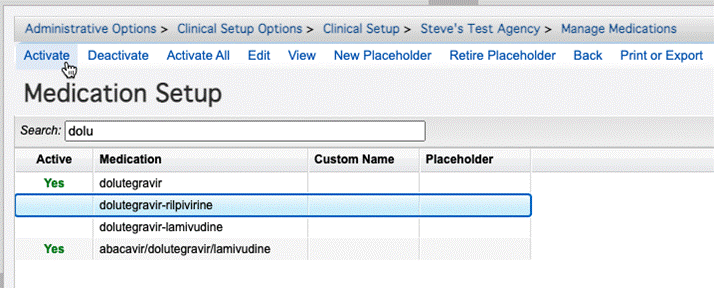
Step 12. From Manage Medications, click Medication Setup.
Step 13. Search for a medication, select it, and click Activate. Repeat for each medication users need.
|
Important Use Activate All only when the imported list contains only the medications your organization wants available, or when your organization intends to track all medications in CAREWare. |
Step 14. Repeat the activation process in every provider domain that needs the medications.
Enable custom medication names
CAREWare medication definitions may display ingredient or component names. Custom Names let the provider display brand names or locally preferred names instead.
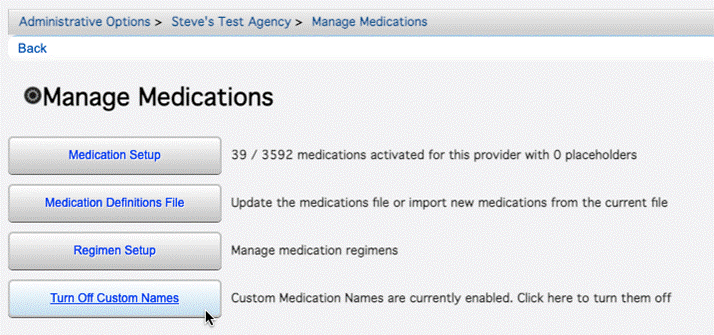
Step 15. On Manage Medications, click Turn On Custom Names.
Assign a custom medication name
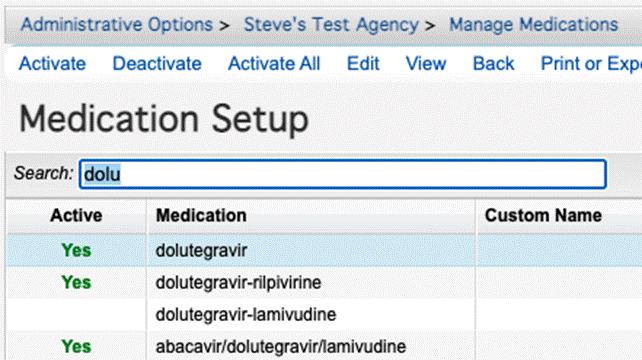
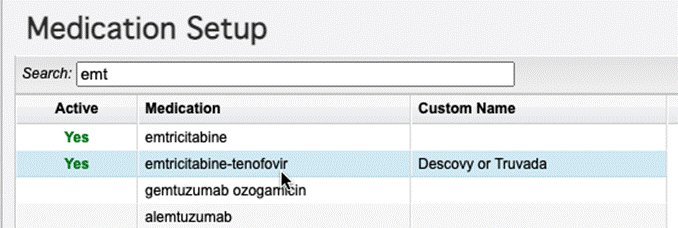
Step 16. Open Medication Setup, search for the medication, select it, and click Edit.
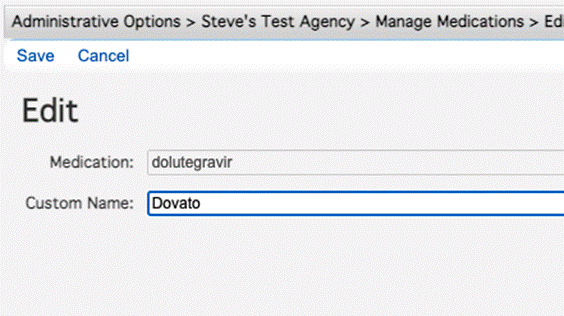
Step 17. Enter the preferred name in Custom Name and click Save.
When medications share the same ingredients
Some brand medications share one ingredient-based medication definition. In that situation, one Custom Name can identify both brands. For example, the source guide shows emtricitabine-tenofovir labeled as Descovy or Truvada.
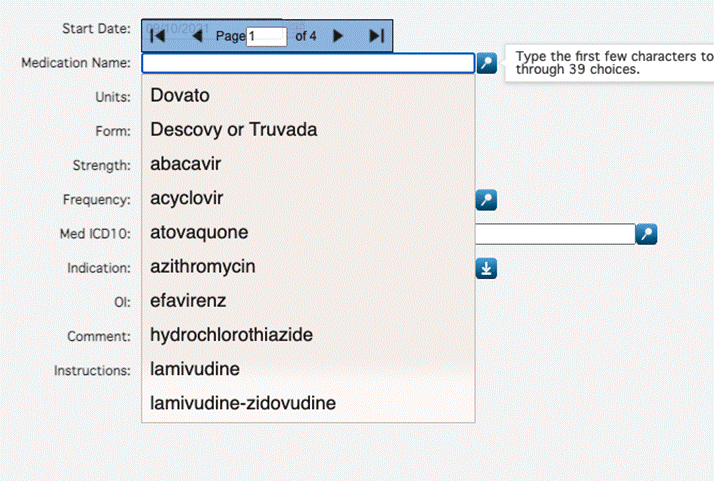
How custom names appear to users
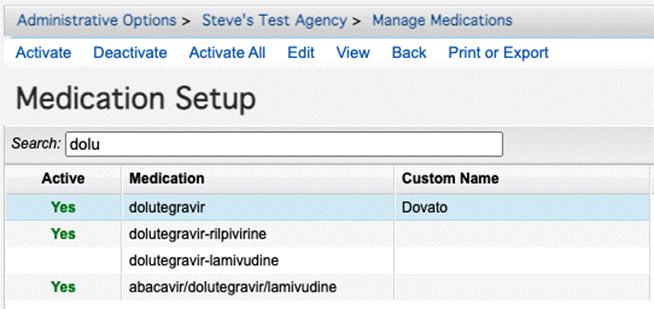
After the medication is activated and the custom name is saved, the custom name appears in the medication selection list for users in that provider domain.
|
Important Custom Names and medication activation apply to the provider where they were configured. Repeat these steps for other providers that need the same setup. |
How to confirm it worked
1. Open medication prescription data entry for a client in the provider you updated.
2. Search for one of the medications you imported and activated.
3. Confirm the medication appears and can be selected.
4. When Custom Names are enabled, confirm the custom display name appears instead of, or alongside, the ingredient-based name as expected.
5. For installations with multiple providers, repeat the check in each provider domain you updated.
Troubleshooting and common questions
Why does an imported medication not appear in data entry?
The definition may have been imported but not activated. Open Medication Setup in the user’s provider domain and confirm the Active column shows Yes.
Why do users in another provider not see the medication?
Activation is provider-specific. Repeat Medication Setup and activation in that provider domain.
Why do I not see the custom name?
Confirm Custom Names are turned on for the provider, then open Medication Setup and verify that the Custom Name was saved for the correct medication definition.
|
Topic |
Description |
|
Instructions for updating the ADAP Formulary |
|
|
Instructions for updating permission groups and user accounts |
|
|
Instructions for enabling clinical data elements |


