


|
Purpose |
Create and manage approved external links that users can open from a client record. |
|
Who should do this |
CAREWare administrators, data managers, or designated support staff with access to Administrative Options and Custom Features. |
|
Use this setup when |
A link must be added, reviewed, updated, or removed from the External Links area of the client menu. |
|
Main warning |
Use approved HTTPS destinations. Do not place passwords, access tokens, or client identifiers directly in a URL. HTTP Fields can transmit client data and require security review. |
|
Video walkthrough |
Quick path
|
Administrative Options > Custom Features > Client Menu Link Management > Add |
Before you begin
• Confirm that Central Administration appears in the top banner before opening setup.
• Decide the link text, description, destination URL, business owner, and whether the link needs HTTP Fields.
• Confirm that the destination is approved by your organization and supports HTTPS.
• Use a test provider and test client record when available.
|
Important Plan and test the link before production use. Use clear, durable labels and descriptions so staff understand the destination and purpose. Treat changes to a link label or URL as a controlled workflow change. |
Open Client Menu Link Management
Step 1. Click Administrative Options.
Step 2. Click Custom Features.
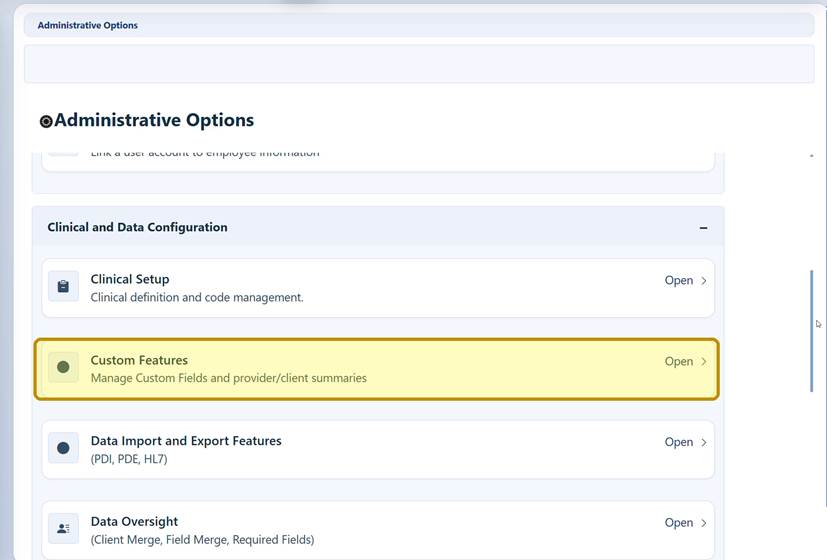
Step 3. Click Client Menu Link Management.
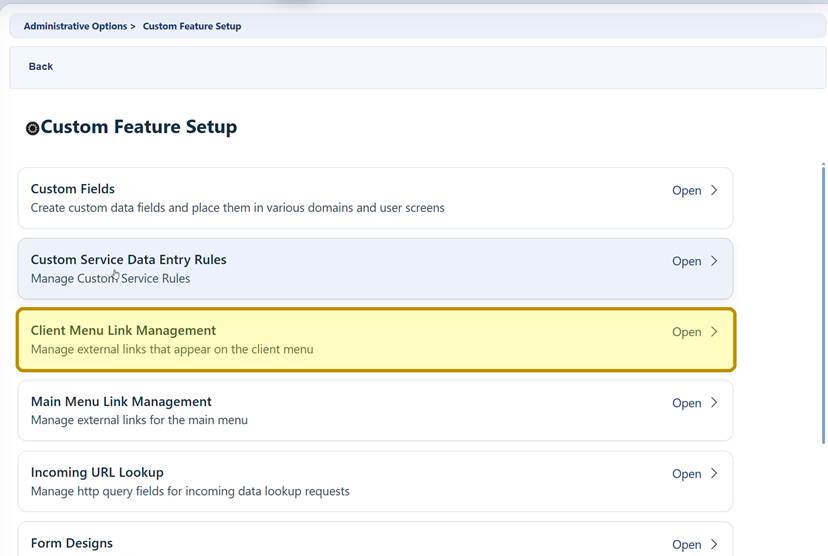
|
Important Client menu links are configured in Central Administration. Verify the top banner before adding, changing, or deleting a link. |
Create an external link
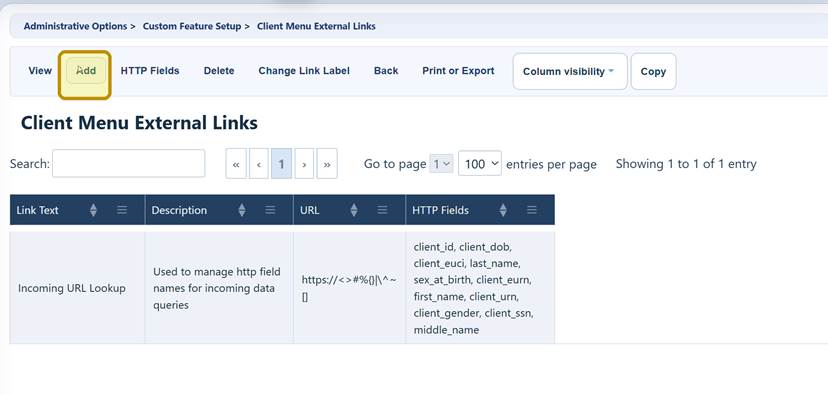
Step 4. On the Client Menu External Links list, click Add.
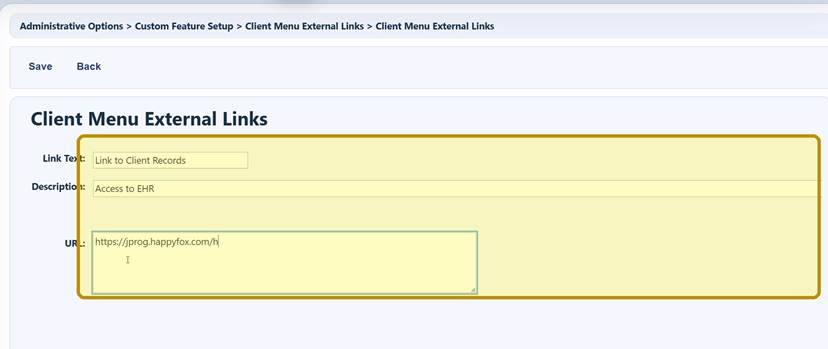
Step 5. Enter a concise Link Text label.
Step 6. Enter a Description that explains the destination or purpose.
Step 7. Enter the complete URL, beginning with lowercase https:// when supported.
Step 8. Click Save.
Link naming and URL guidance
|
Do |
Avoid |
|
Use a label that users can recognize in the client menu. |
Vague labels such as “Link 1” or “Website.” |
|
Use the description to explain the destination and purpose. |
Changing an existing link to an unrelated purpose without review. |
|
Use an approved HTTPS destination and verify it before release. |
Passwords, access tokens, or client identifiers typed directly into the URL. |
|
Important The URL field is caps sensitive, enter http or https for the url. |
Review and manage the saved link
Step 9. Confirm that the new link appears in the Client Menu External Links list with the correct label, description, and URL.
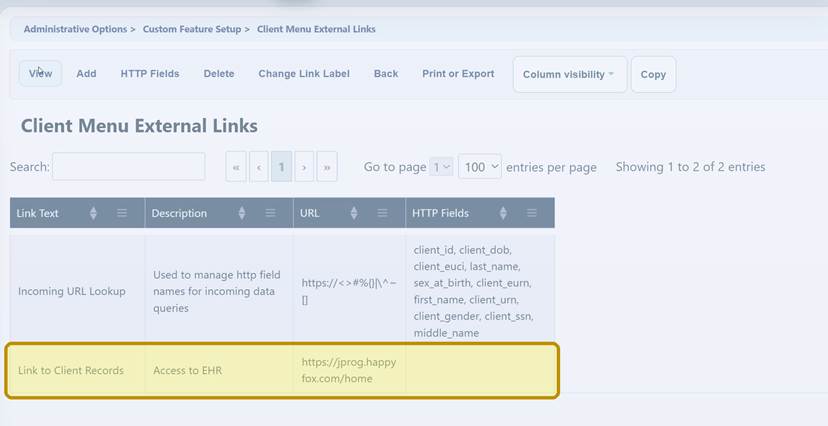
Common management buttons
|
Button |
What it does |
Use with care |
|
View |
Opens the selected link definition. |
Review details before making a change. |
|
HTTP Fields |
Configures client fields sent to the destination. |
Use only for an approved, tested integration. |
|
Delete |
Removes the selected link definition. |
Confirm that no workflow depends on the link. |
|
Change Link Label |
Changes the displayed link label. |
Coordinate training and documentation updates. |
|
Print or Export |
Prints or exports the link list. |
Use for review and change-control records. |
|
Important HTTP Fields may transmit client identifiers or other client data to an external system. Use HTTPS, confirm that the receiving system is authorized to receive the data, and test with non-production records before release. |
|
Tip Document the link owner, approval date, purpose, destination, and any HTTP Fields. If the purpose changes substantially, create a new link rather than repurposing an existing one. |
Verify the link in a client record
Step 10. Click Switch Providers.
Step 11. Select the provider, then click Switch Providers.
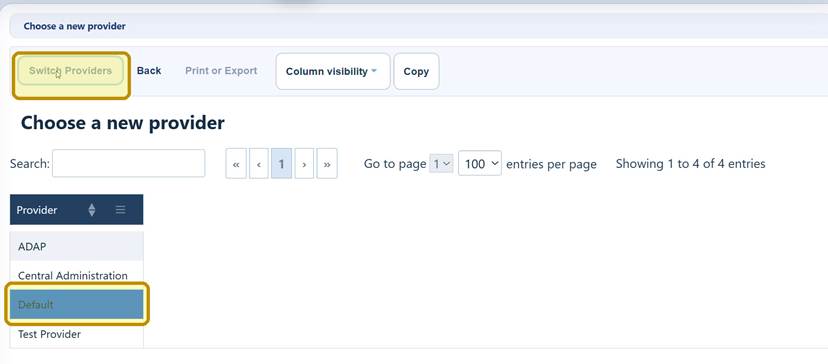
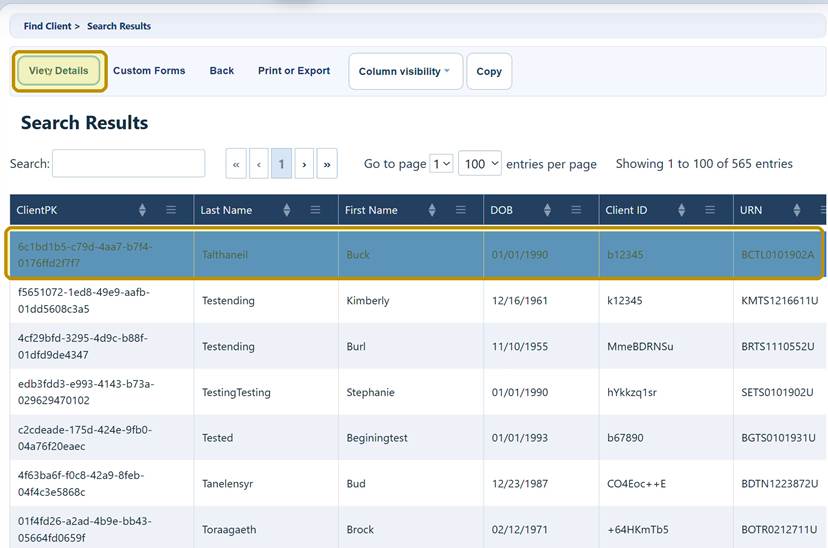
Step 12. Click Find Client, enter a search term, and click Client Search.
Step 13. Select a client, then click View Details.
Step 14. Scroll the client menu and click External Links.
Step 15. Click Open for the link you created.
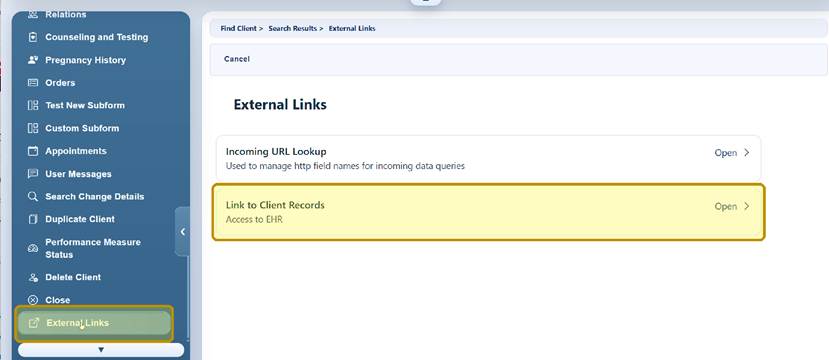
Step 16. Confirm that the correct destination opens, then return to CAREWare.
|
Important Use a test client whenever possible. Do not test a link that sends HTTP Fields with a production client until the integration and receiving system have been approved. |
Validation and maintenance
Final validation checklist
- Confirm that the link text and description are clear and appear under External Links.
- Open the link and verify the correct HTTPS destination.
- Confirm that the destination is accessible to the intended users and does not require credentials embedded in the URL.
- When HTTP Fields are used, confirm that only the approved fields are sent and that the receiving system handles them securely.
- Test the link for each applicable provider, role, browser, and menu configuration.
- Record the link owner, purpose, approval, and change date.
Helpful tips for reliable links
|
Topic |
Recommended practice |
|
Plan before building |
Define the business purpose, owner, audience, destination, and security requirements before adding the link. |
|
Clear labels |
Choose link text that remains understandable in the client menu, documentation, and support requests. |
|
Descriptions |
State what the user will access and why the link is available. |
|
Security |
Prefer HTTPS and never place credentials, tokens, or unapproved client identifiers directly in the URL. |
|
Change management |
Coordinate label, URL, HTTP Field, and deletion changes with affected teams and test before release. |
|
Important Changes that appear cosmetic, such as renaming a link, can affect training materials, user expectations, and documented workflows. Coordinate the change and verify the link again after saving. |
|
Tip Use Menu Item Customization when a link or menu item should be hidden for selected users or groups rather than deleting the link definition. |
Troubleshooting and common questions
Why can’t I see Client Menu Link Management?
Confirm that you are in Central Administration and that your account has permission to access Administrative Options and Custom Features. Ask a local administrator to review permissions when needed.
Why does Save fail?
Complete Link Text, Description, and URL, verify that the URL is complete, and review any validation message displayed beside a field.
Why does the link not appear in the client record?
Confirm that you switched to the intended provider, reopened the client record, and scrolled to External Links. Also review menu customization and user permissions.
Why does the destination not open?
Verify the URL, confirm that the site is available to the user’s network, and check browser pop-up or security restrictions. Open the destination directly in a browser to isolate the issue.
When should I use My Links instead?
Use My Links for shared external links in the main CAREWare menu. Use Client Menu Link Management for links opened from within a client record.
Related CAREWare guides and resources
|
Resource |
How it helps |
|
Create and access external links from the main CAREWare menu. |
|
|
Show or hide menu items for users, provider groups, central groups, or the provider. |
|
|
Locate and open a client record to verify the new external link. |
|
|
Review planning, naming, URL, testing, and change-management practices used for custom configurations. |
|
|
Open related CAREWare custom-feature guides and resources. |


