


|
|
|
Purpose |
Create and maintain custom control definitions that can be used on CAREWare custom tabs, service fields, subforms, and forms. |
|
Who should do this |
CAREWare administrators, data managers, or designated support staff with access to Administrative Options and Custom Fields. |
|
Use this setup when |
A new field definition is needed or to configure its data type, length, default value, validation, allowed values, or attachment settings. |
|
Main warning |
Plan the name and control type before the field is activated. Repurposing a control after it contains data can affect forms, reports, imports, and historical records. |
|
Quick path Administrative Options > Custom Features > Custom Fields > Custom Control Setup > Add |
Before you begin
- Confirm the current provider or Central Administration domain in the top banner. Create the definition in the area that should manage it.
- Decide what the field must collect and choose the control type before entering settings.
- Use a clear, durable name and description. Avoid reusing an existing control for a different meaning.
- Prepare any drop-down values, URL, file extensions, maximum length, or default value that the control will need.
|
Important
|
Choose the right control type
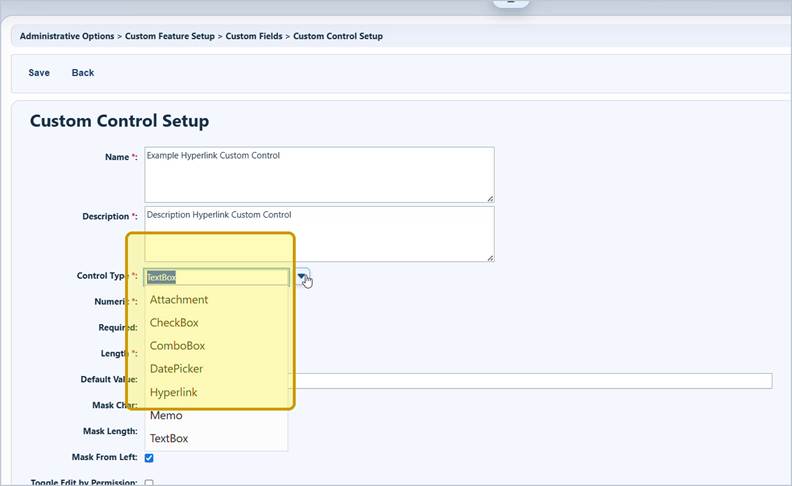
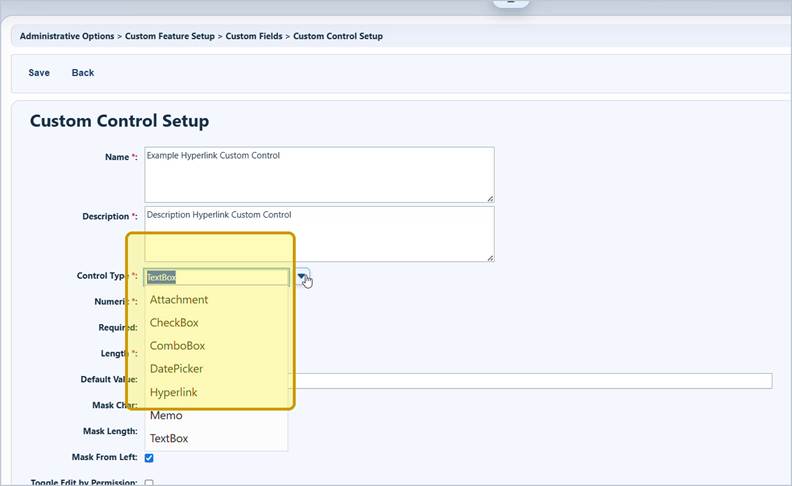
The Control Type determines what users can enter and which settings appear. Choose the simplest control that accurately represents the data.
|
Control type |
Use it for |
Examples |
|
Attachment |
Uploading a file with defined extensions and size limits. |
Referral document, signed form, supporting image |
|
CheckBox |
A true/false or yes/no condition. |
Consent received; follow-up completed |
|
ComboBox |
One selection from a standardized list. |
Status, category, assigned staff |
|
DatePicker |
A valid calendar date. |
Review date, enrollment date, expiration date |
|
Hyperlink |
A web address that users can open. |
External resource, secure portal, reference page |
|
Memo |
Longer narrative text. |
Notes, explanation, free-text comments |
|
TextBox |
Short text or numeric entry. |
Identifier, count, short label, phone extension |
Decision tips
- Use a ComboBox instead of a CheckBox when you need more than two states, such as Yes, No, Unknown, and Not Applicable.
- Use a TextBox rather than a numeric TextBox for IDs, ZIP codes, phone numbers, or codes that may contain leading zeros or punctuation.
- Use a Memo for narrative information and a ComboBox for information that must be counted, grouped, or reported consistently.
- Use a DatePicker for dates instead of a text field so CAREWare can enforce a valid date format.
|
Important
|
Open Custom Control Setup
Step 1. Click Administrative Options.
Step 2. Click Custom Features.
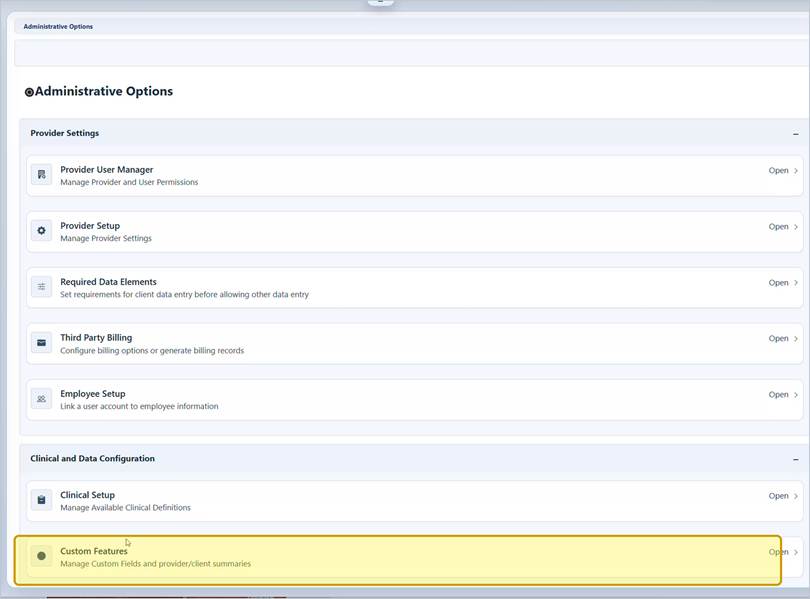
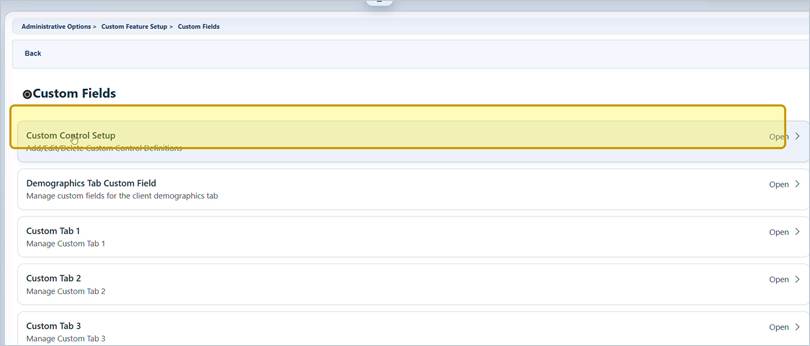
Step 3. Click Custom Fields.
Step 4. Click Custom Control Setup.
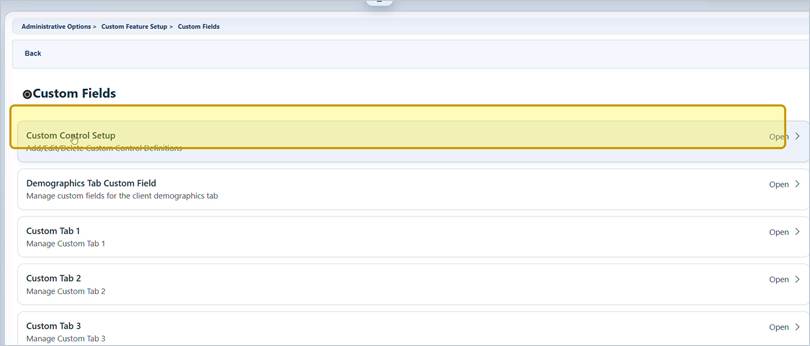
Create the control definition
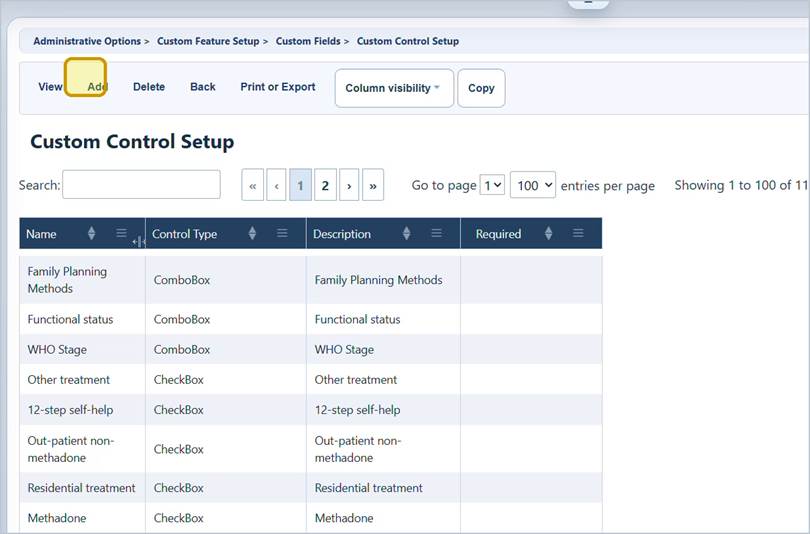
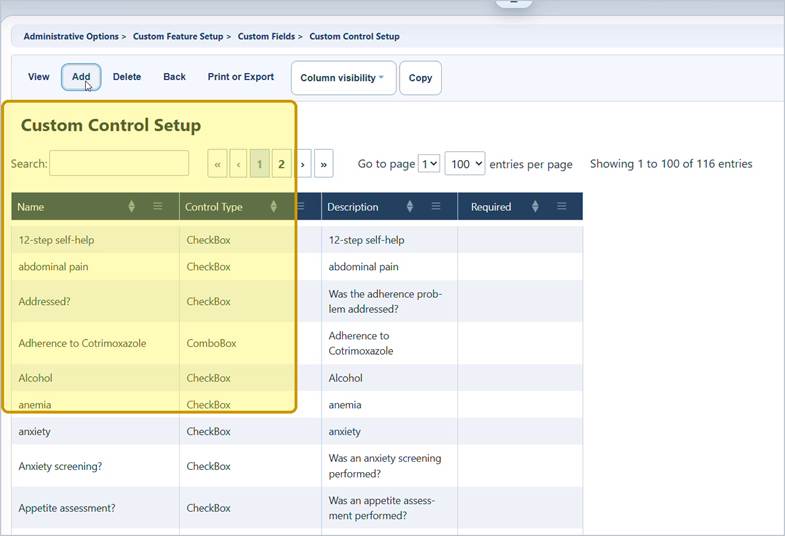
Step 5. On the Custom Control Setup list, click Add.
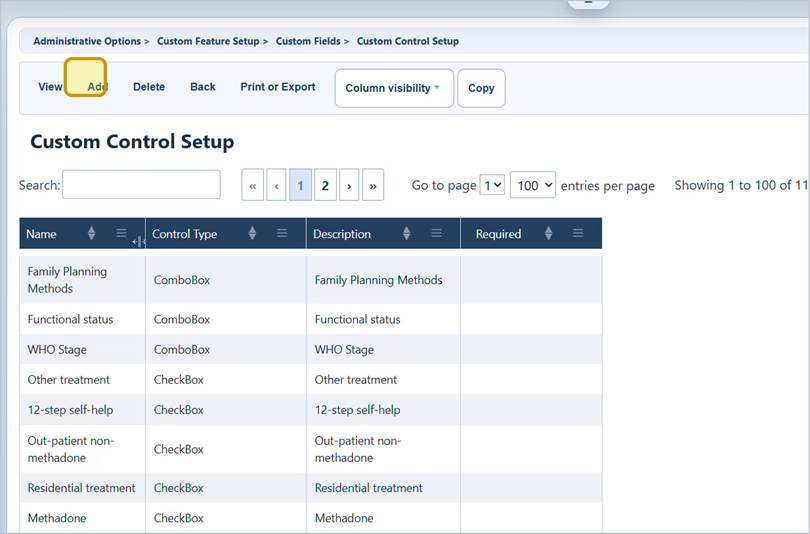
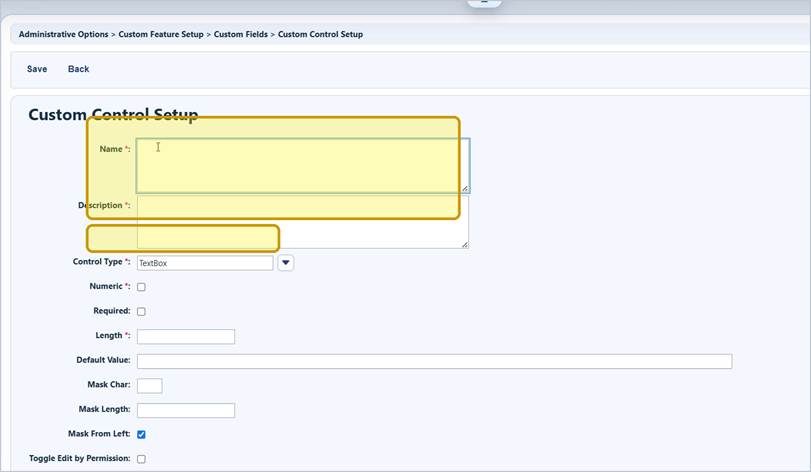
Step 6. Enter a Name and Description.
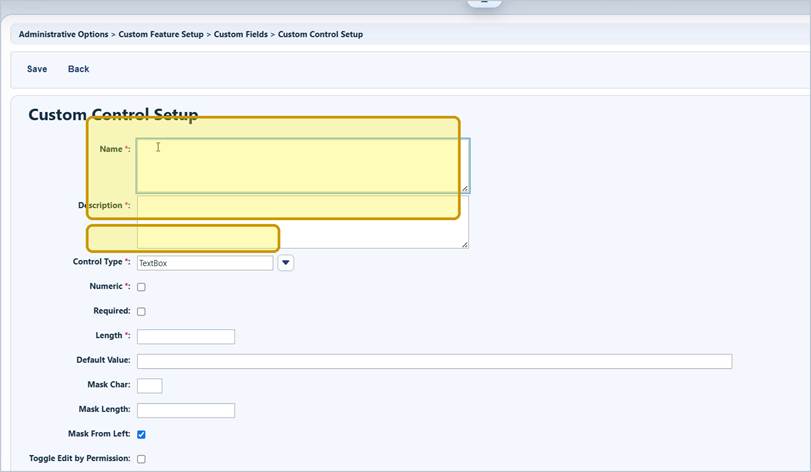
Naming guidance
|
Do |
Avoid |
|
Use a concise name that will make sense on a form, report, or template. |
Generic names such as “Status 2” or “Other Field.” |
|
Use the description to define the purpose and expected data. |
Changing the meaning of a control after staff have entered data. |
|
Use consistent capitalization and terminology across related controls. |
Names that differ only by punctuation or spacing. |
Select the control type and common settings
Step 7. Select the Control Type
Settings that appear on several control types
|
Setting |
What it does |
Use with care |
|
Required |
Requires a value when the field is presented in a workflow that enforces required data. |
Do not require a value that staff may be unable to obtain. |
|
Default Value |
Pre-populates the field with a starting value. |
Defaults can create inaccurate data when users accept them without review. |
|
Toggle Edit by Permission |
Allows edit access to be controlled by permissions. |
Verify the applicable roles and permissions before activation. |
Step 8. Configure the type-specific settings, then click Save.
|
Important After a control contains production data, do not change its meaning or replace it with a different data concept. Create a new control when the business meaning changes. |
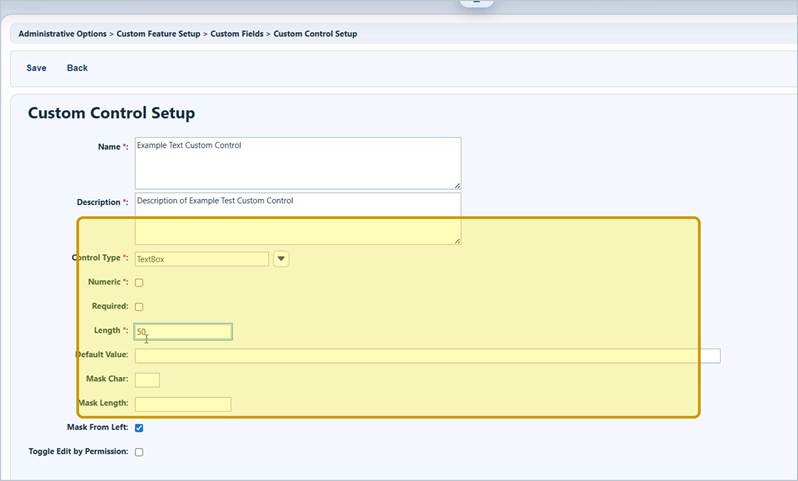
Configure a TextBox
A TextBox collects a single line of short text. Select Numeric only when CAREWare should accept the entry as a number only.
|
TextBox setting |
Guidance |
|
Numeric |
Use for quantities or values that will be treated as numbers. Do not use for identifiers, ZIP codes, or phone numbers. |
|
Length |
Set the maximum number of characters needed. The video example sets a text length of 50. |
|
Default Value |
Enter only a value that is normally correct and safe to prefill. |
|
Mask Char / Mask Length / Mask From Left |
Use masking only when the displayed value must be partially obscured or formatted. Test it with realistic data before release. |
|
Required |
Select only if every applicable user can provide the value. |
|
Tip
|
Configure a ComboBox and its values
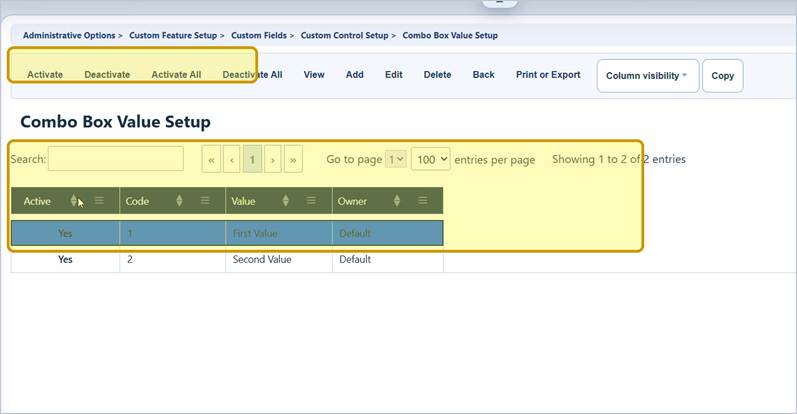
A ComboBox presents a controlled drop-down list. It is the best choice when users must select one value from a standardized set.
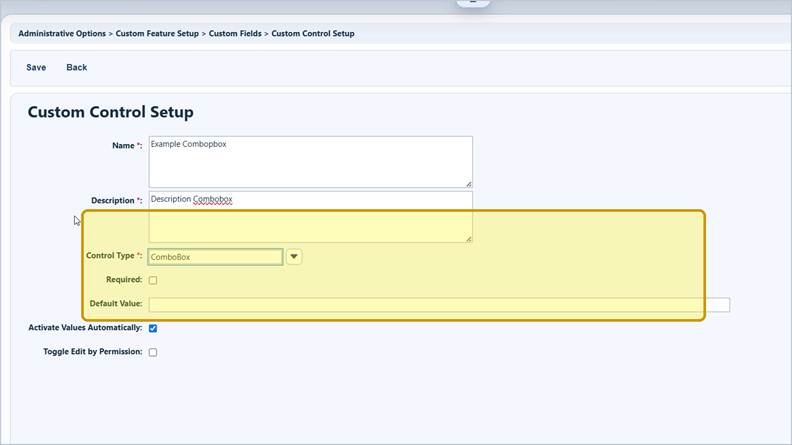
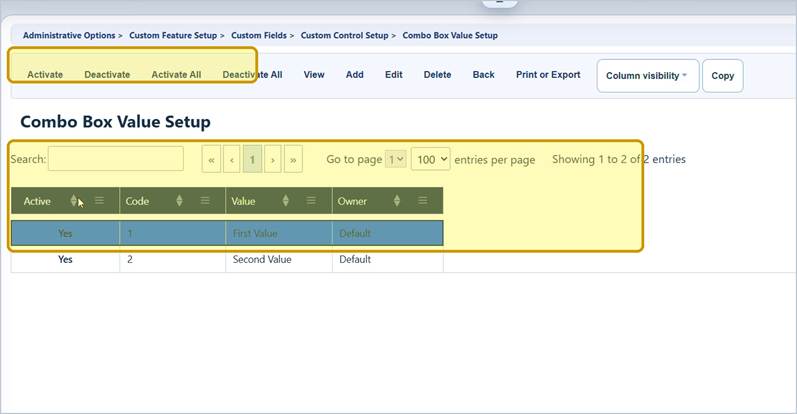
Step 9. Save the ComboBox.
Step 10. Click Edit Values.
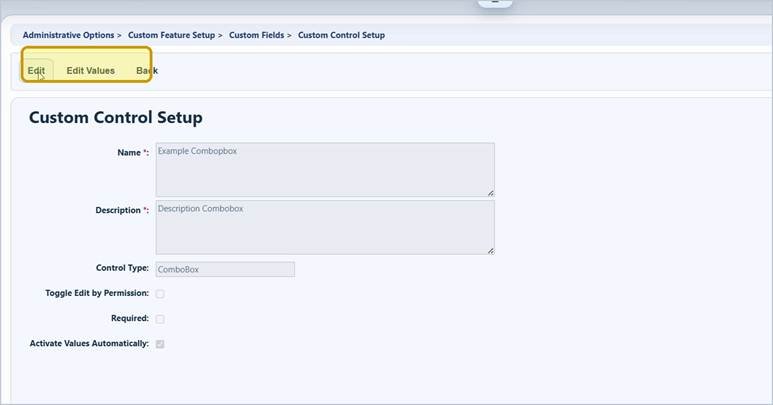
Step 11. Click Add.
Step 12. Enter a Code and a Value, then save.
Step 13. Repeat for each choice.
Step 14. Activate the values that should be available.
|
Important When a ComboBox value has already been used in client data, deactivate it instead of deleting it. Deactivation prevents new selection while preserving historical records. |
ComboBox tips
- Use stable, unique codes. Do not recycle a code for a different meaning.
- Order and name choices so staff can distinguish them quickly.
- Use Activate Values Automatically only when newly added values should become available immediately.
- Avoid overlapping choices such as “Other,” “Unknown,” and “Not sure” unless each has a defined reporting purpose.
Configure CheckBox, DatePicker, and Memo controls
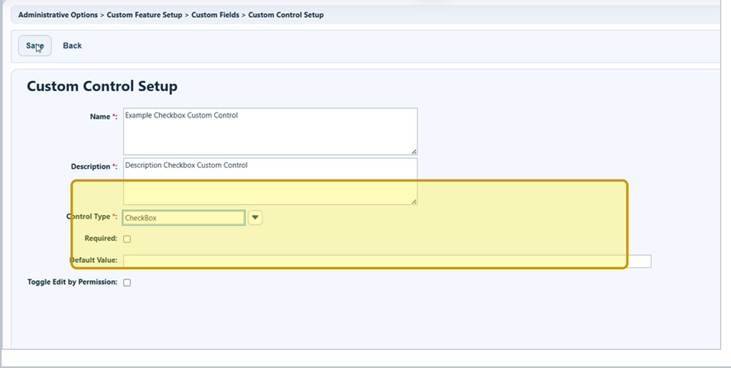
CheckBox
Use a CheckBox for a true/false condition. Write the field name so the meaning of a checked box is unambiguous—for example, “Consent received.”
|
Tip A CheckBox cannot clearly represent Unknown, Not Asked, or Not Applicable. Use a ComboBox when you need those additional states. |
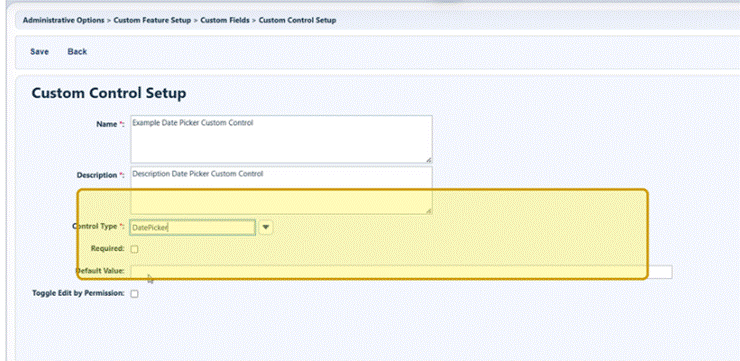
DatePicker
Use a DatePicker for a calendar date.
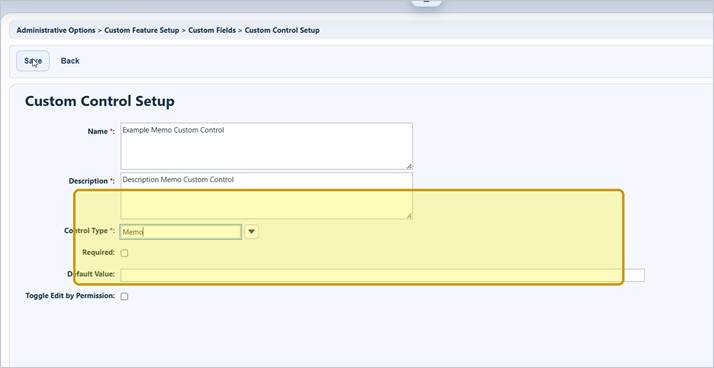
Memo
Use a Memo for longer narrative text, explanations, or comments.
|
Data quality tip Use structured controls for countable data; reserve Memo fields for longer notes. |
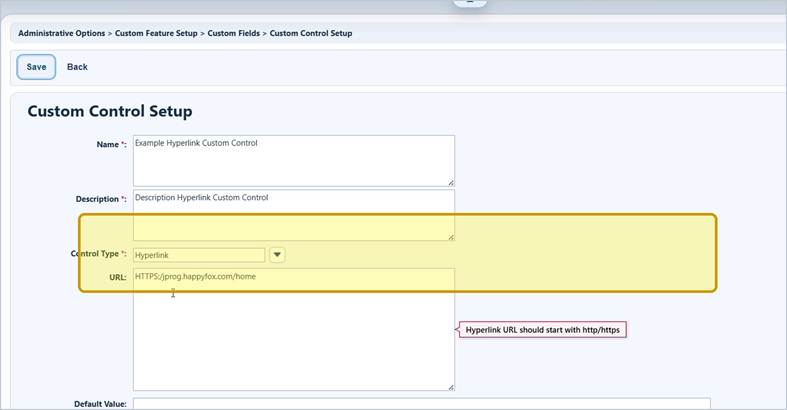
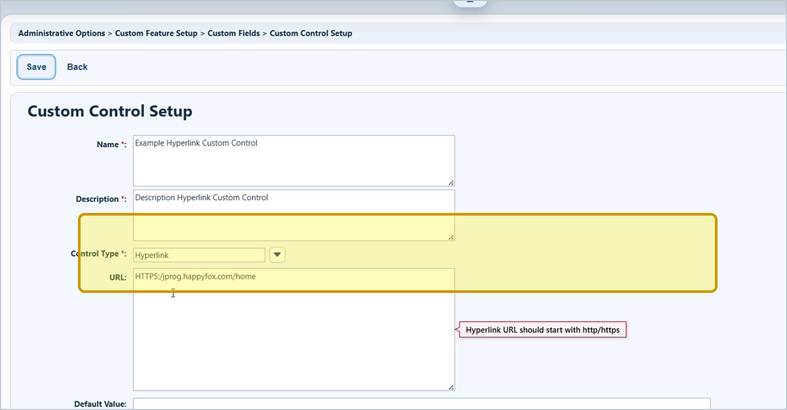
Configure a Hyperlink
A Hyperlink stores a web address that users can open from CAREWare. Enter the complete destination in the URL field.
|
Guideline |
Why it matters |
|
Begin the URL with lowercase http:// or https://. |
Secure sites have a prefix of HTTPS |
|
Use https:// whenever the destination supports it. |
HTTPS protects the connection between the user and the destination site. |
|
Open and verify the link before release. |
Ensure the destination is correct or accessible. |
|
Do not place credentials, tokens, or client identifiers in the URL. |
Sensitive values can be exposed in browser history, logs, or shared links. |
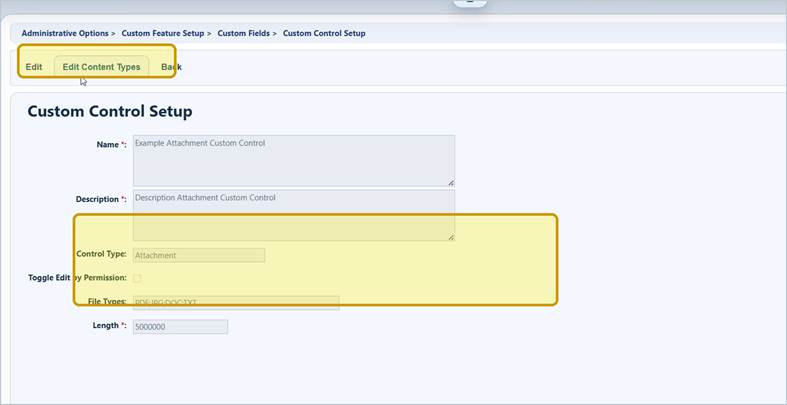
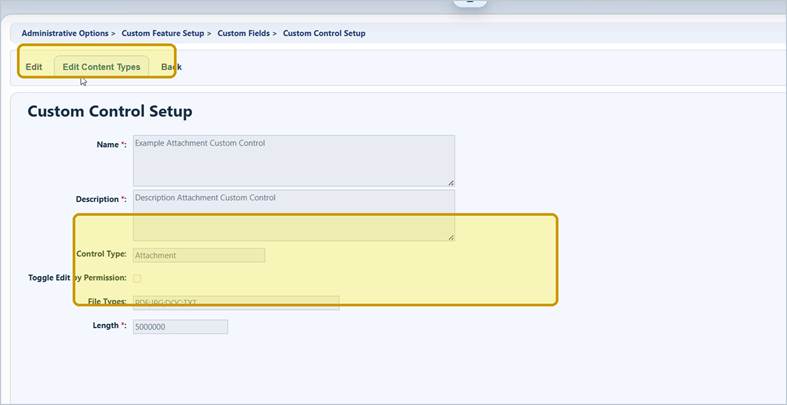
Configure an Attachment control
An Attachment control allows users to upload files. Define the permitted file types and a reasonable maximum length before the control is activated.
|
Setting |
Guidance |
|
File Types |
Enter only the extensions your organization permits. The video example uses PDF;JPG;DOC;TXT. Follow the delimiter required by your CAREWare build. |
|
Length |
Set a maximum file length that aligns with server capacity and local policy. The video example displays 5000000. |
|
Toggle Edit by Permission |
Use permissions when only designated staff should add or change attachments. |
Step 15. On the saved Attachment detail page, click Edit Content Types.
Step 16. Click Add.
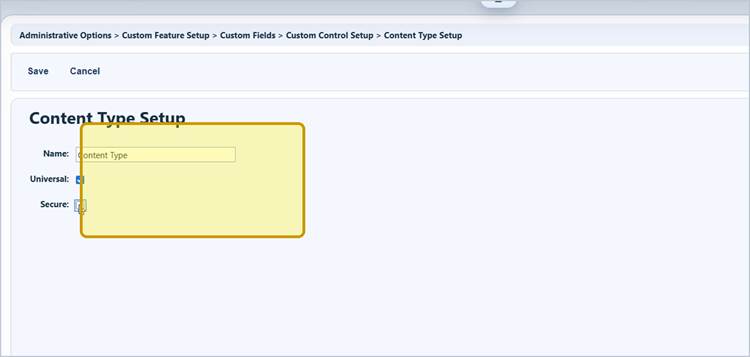
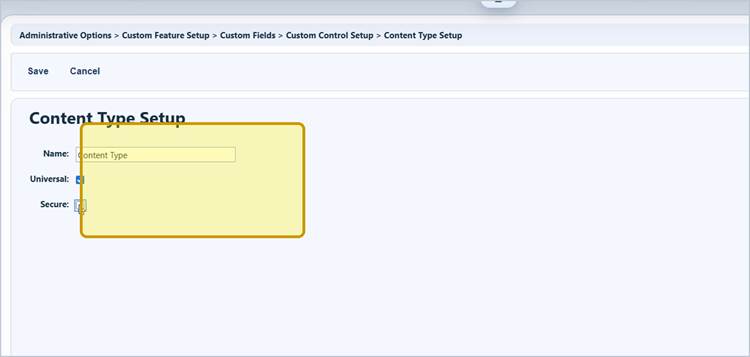
Step 17. Enter the content type Name
Step 18. Select Universal and/or Secure according to local policy
Step 19. Click Save.
|
Important Confirm the meaning and permission impact of Universal and Secure with your CAREWare administrator or security policy before production use. Do not allow file types that your organization cannot safely store or review. |
Verify the control and make it available
Confirm the Control Name, Control Type, Description, and Required status.
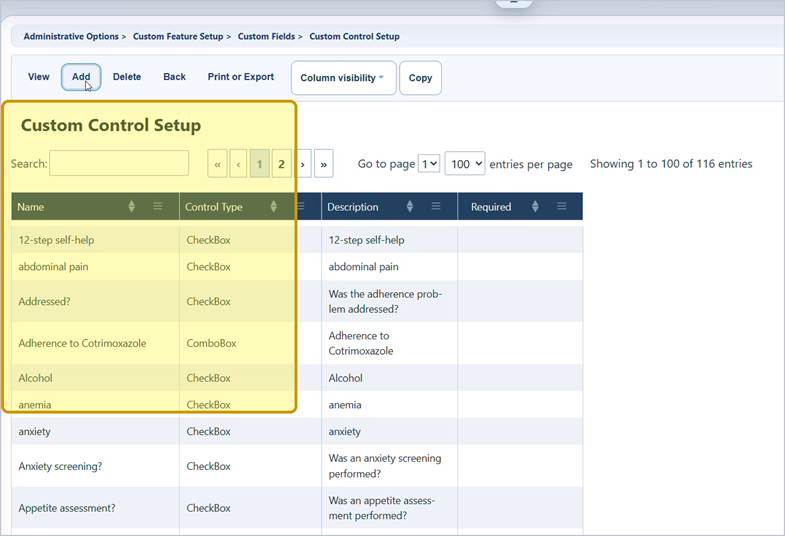
To activate the custom control, click Back and then select the location the custom control should be active for.
Example: If this custom control should be a Custom Service Field, click Service Custom Fields and activate it there.
Final validation checklist
- Test the control with a non-production or test record when available.
- Confirm required behavior, default values, length limits, and permissions.
- For ComboBox controls, confirm the correct active values appear.
- For Hyperlink controls, open the link.
- For Attachment controls, test that the correct types of files can be uploaded and verify file-size behavior.
- Confirm reports, forms, or templates display the control as expected.
Helpful tips for reliable custom controls
|
Topic |
Recommended practice |
|
Plan before building |
Write the field purpose, data owner, control type, valid values, and retention needs before creating it. |
|
One meaning per control |
Do not reuse an existing control for a new question simply because its type is convenient. |
|
Required data |
Require only information that is consistently available and necessary for the workflow. |
|
Default values |
Use defaults sparingly. A blank value is often safer than a value that could be accepted without verification. |
|
Permissions |
Use Toggle Edit by Permission for sensitive or controlled data, and test each relevant role. |
|
Standardization |
Use ComboBox values for data that must be reported consistently. Keep codes stable even when display wording is refined. |
|
Field names |
Choose names that remain understandable outside the original form, including in exports and reports. |
|
Change management |
Document who approved the control, when it was activated, and how future changes will be handled. |
Before changing an existing control
- Check where the control is currently used.
- Determine whether it already contains client or service data.
- Review any reports, imports, exports, or form logic that depend on it.
- Create a replacement control rather than changing the original meaning.
- For a ComboBox, deactivate obsolete values instead of deleting used values.
|
Important Changes that seem cosmetic—such as renaming a field or value—can affect training materials, report definitions, import templates, and staff workflows. Coordinate changes and test them before release. |
Troubleshooting and common questions
Why can’t I see Custom Control Setup?
Confirm that your user account has permission to access Administrative Options, Custom Features, and Custom Fields. Ask a local administrator to review permissions.
Why does Save fail?
Check required fields, TextBox Length, URL format, attachment extensions and length, and any validation message shown beside the field.
Why does my ComboBox have no choices?
Open the saved definition, click Edit Values, add the Code and Value entries, and make sure the intended values are active.
Why does the new control not appear on a tab or form?
The control must also be activated in the appropriate custom field location.
Why is the Hyperlink rejected?
Enter the complete URL beginning with lowercase http:// or https:// and remove spaces before the scheme.
Why is an attachment rejected?
Confirm its extension or file type is allowed, the file is smaller than the configured maximum size allowed, the required content type exists, the user has permission to upload files, and the user has not exceeded the File Quota for daily uploads.
Why am I seeing the wrong provider’s setup?
Verify if currently logged into Central Administration or a provider by checking in the top banner, then return to the correct provider before making changes.
Why does a renamed field not appear in another list?
Refresh the list using the Resetting the Custom Field List guide or contact Help Desk.
Related CAREWare guides and resources
|
Resource |
Description |
|
Manage ComboBox choices, including adding, editing, activating, and deactivating values. |
|
|
Use custom fields in CAREWare import and export templates. |
|
|
Refresh the custom field list when a new or changed field is not displayed. |
|
|
Instructions for adjusting permission groups and user accounts |
|
|
Guide for understanding and adjusting limits for uploads and reports. |
Custom Control Setup
|
|
|
Purpose |
Create and maintain custom control definitions that can be used on CAREWare custom tabs, service fields, subforms, and forms. |
|
Who should do this |
CAREWare administrators, data managers, or designated support staff with access to Administrative Options and Custom Fields. |
|
Use this setup when |
A new field definition is needed or to configure its data type, length, default value, validation, allowed values, or attachment settings. |
|
Main warning |
Plan the name and control type before the field is activated. Repurposing a control after it contains data can affect forms, reports, imports, and historical records. |
|
Quick path Administrative Options > Custom Features > Custom Fields > Custom Control Setup > Add |
Before you begin
- Confirm the current provider or Central Administration domain in the top banner. Create the definition in the area that should manage it.
- Decide what the field must collect and choose the control type before entering settings.
- Use a clear, durable name and description. Avoid reusing an existing control for a different meaning.
- Prepare any drop-down values, URL, file extensions, maximum length, or default value that the control will need.
|
Important
|
Choose the right control type
The Control Type determines what users can enter and which settings appear. Choose the simplest control that accurately represents the data.
|
Control type |
Use it for |
Examples |
|
Attachment |
Uploading a file with defined extensions and size limits. |
Referral document, signed form, supporting image |
|
CheckBox |
A true/false or yes/no condition. |
Consent received; follow-up completed |
|
ComboBox |
One selection from a standardized list. |
Status, category, assigned staff |
|
DatePicker |
A valid calendar date. |
Review date, enrollment date, expiration date |
|
Hyperlink |
A web address that users can open. |
External resource, secure portal, reference page |
|
Memo |
Longer narrative text. |
Notes, explanation, free-text comments |
|
TextBox |
Short text or numeric entry. |
Identifier, count, short label, phone extension |
Decision tips
- Use a ComboBox instead of a CheckBox when you need more than two states, such as Yes, No, Unknown, and Not Applicable.
- Use a TextBox rather than a numeric TextBox for IDs, ZIP codes, phone numbers, or codes that may contain leading zeros or punctuation.
- Use a Memo for narrative information and a ComboBox for information that must be counted, grouped, or reported consistently.
- Use a DatePicker for dates instead of a text field so CAREWare can enforce a valid date format.
|
Important
|
Open Custom Control Setup
Step 1. Click Administrative Options.
Step 2. Click Custom Features.
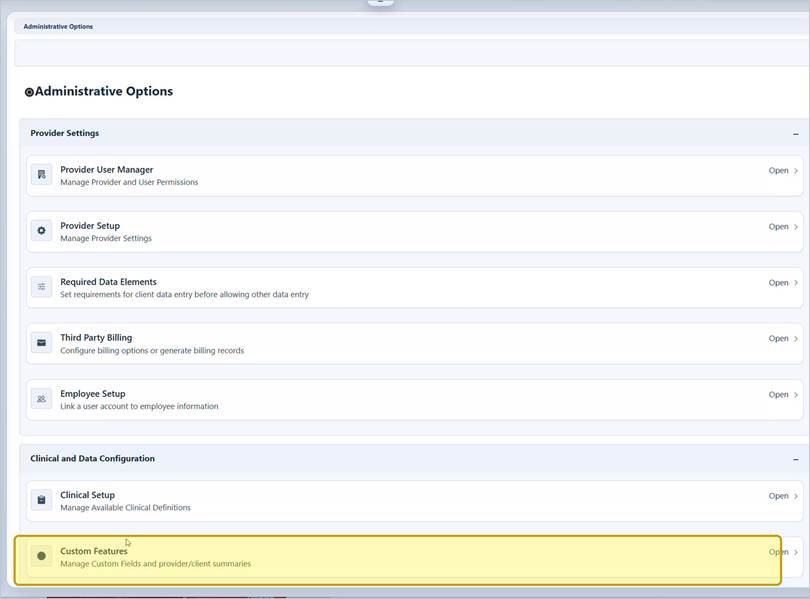
Step 3. Click Custom Fields.
Step 4. Click Custom Control Setup.
Create the control definition
Step 5. On the Custom Control Setup list, click Add.
Step 6. Enter a Name and Description.
Naming guidance
|
Do |
Avoid |
|
Use a concise name that will make sense on a form, report, or template. |
Generic names such as “Status 2” or “Other Field.” |
|
Use the description to define the purpose and expected data. |
Changing the meaning of a control after staff have entered data. |
|
Use consistent capitalization and terminology across related controls. |
Names that differ only by punctuation or spacing. |
Select the control type and common settings
Step 7. Select the Control Type
Settings that appear on several control types
|
Setting |
What it does |
Use with care |
|
Required |
Requires a value when the field is presented in a workflow that enforces required data. |
Do not require a value that staff may be unable to obtain. |
|
Default Value |
Pre-populates the field with a starting value. |
Defaults can create inaccurate data when users accept them without review. |
|
Toggle Edit by Permission |
Allows edit access to be controlled by permissions. |
Verify the applicable roles and permissions before activation. |
Step 8. Configure the type-specific settings, then click Save.
|
Important After a control contains production data, do not change its meaning or replace it with a different data concept. Create a new control when the business meaning changes. |
Configure a TextBox
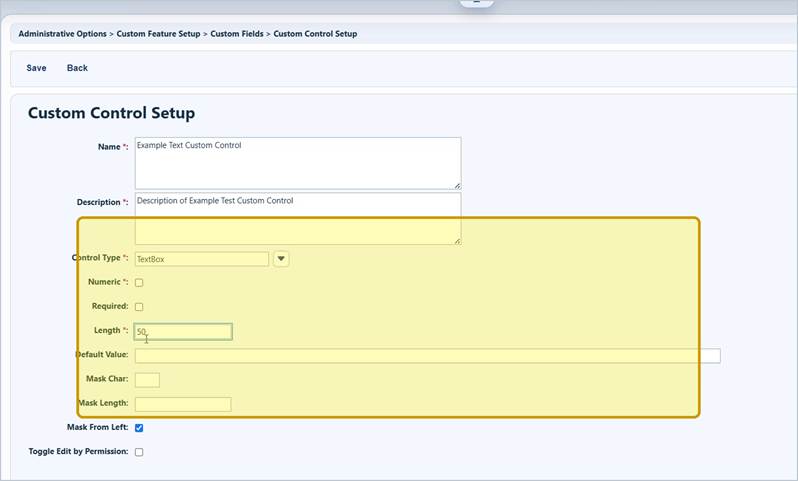
A TextBox collects a single line of short text. Select Numeric only when CAREWare should accept the entry as a number only.
|
TextBox setting |
Guidance |
|
Numeric |
Use for quantities or values that will be treated as numbers. Do not use for identifiers, ZIP codes, or phone numbers. |
|
Length |
Set the maximum number of characters needed. The video example sets a text length of 50. |
|
Default Value |
Enter only a value that is normally correct and safe to prefill. |
|
Mask Char / Mask Length / Mask From Left |
Use masking only when the displayed value must be partially obscured or formatted. Test it with realistic data before release. |
|
Required |
Select only if every applicable user can provide the value. |
|
Tip
|
Configure a ComboBox and its values
A ComboBox presents a controlled drop-down list. It is the best choice when users must select one value from a standardized set.
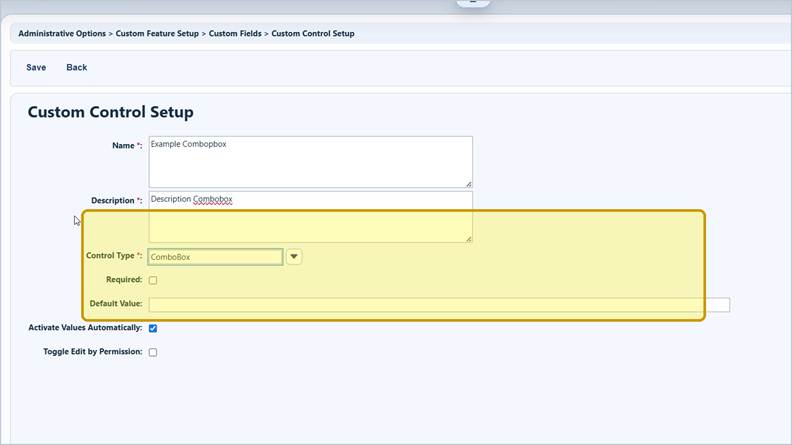
Step 9. Save the ComboBox.
Step 10. Click Edit Values.
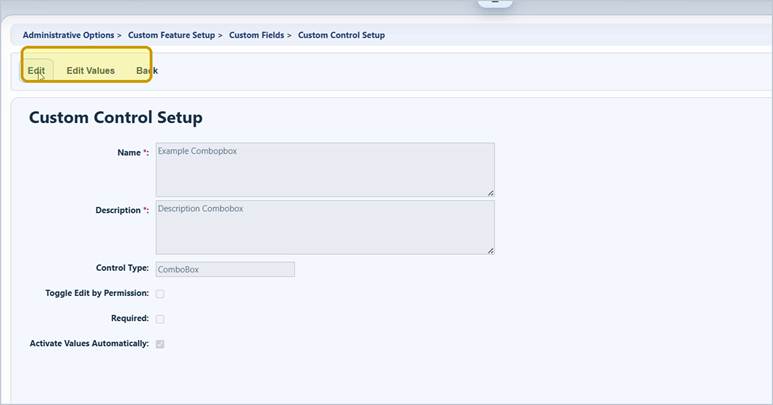
Step 11. Click Add.
Step 12. Enter a Code and a Value, then save.
Step 13. Repeat for each choice.
Step 14. Activate the values that should be available.
|
Important When a ComboBox value has already been used in client data, deactivate it instead of deleting it. Deactivation prevents new selection while preserving historical records. |
ComboBox tips
- Use stable, unique codes. Do not recycle a code for a different meaning.
- Order and name choices so staff can distinguish them quickly.
- Use Activate Values Automatically only when newly added values should become available immediately.
- Avoid overlapping choices such as “Other,” “Unknown,” and “Not sure” unless each has a defined reporting purpose.
Configure CheckBox, DatePicker, and Memo controls
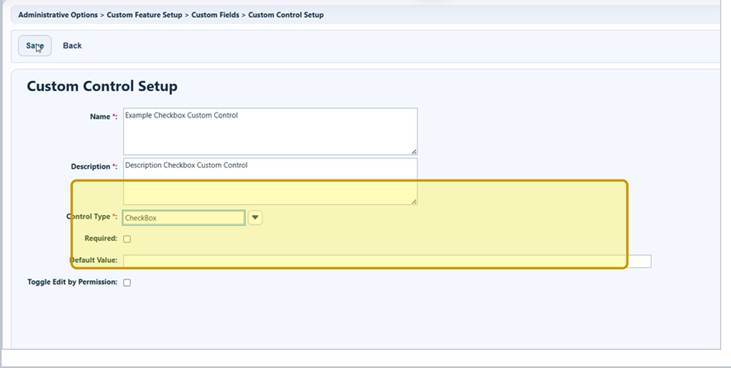
CheckBox
Use a CheckBox for a true/false condition. Write the field name so the meaning of a checked box is unambiguous—for example, “Consent received.”
|
Tip A CheckBox cannot clearly represent Unknown, Not Asked, or Not Applicable. Use a ComboBox when you need those additional states. |
DatePicker
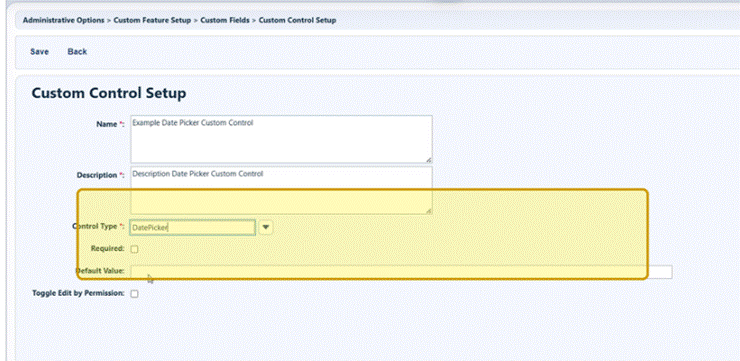
Use a DatePicker for a calendar date.
Memo
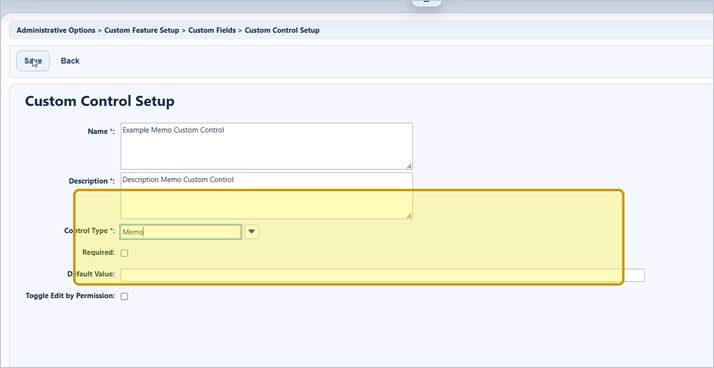
Use a Memo for longer narrative text, explanations, or comments.
|
Data quality tip Use structured controls for countable data; reserve Memo fields for longer notes. |
Configure a Hyperlink
A Hyperlink stores a web address that users can open from CAREWare. Enter the complete destination in the URL field.
|
Guideline |
Why it matters |
|
Begin the URL with lowercase http:// or https://. |
Secure sites have a prefix of HTTPS |
|
Use https:// whenever the destination supports it. |
HTTPS protects the connection between the user and the destination site. |
|
Open and verify the link before release. |
Ensure the destination is correct or accessible. |
|
Do not place credentials, tokens, or client identifiers in the URL. |
Sensitive values can be exposed in browser history, logs, or shared links. |
Configure an Attachment control
An Attachment control allows users to upload files. Define the permitted file types and a reasonable maximum length before the control is activated.
|
Setting |
Guidance |
|
File Types |
Enter only the extensions your organization permits. The video example uses PDF;JPG;DOC;TXT. Follow the delimiter required by your CAREWare build. |
|
Length |
Set a maximum file length that aligns with server capacity and local policy. The video example displays 5000000. |
|
Toggle Edit by Permission |
Use permissions when only designated staff should add or change attachments. |
Step 15. On the saved Attachment detail page, click Edit Content Types.
Step 16. Click Add.
Step 17. Enter the content type Name
Step 18. Select Universal and/or Secure according to local policy
Step 19. Click Save.
|
Important Confirm the meaning and permission impact of Universal and Secure with your CAREWare administrator or security policy before production use. Do not allow file types that your organization cannot safely store or review. |
Verify the control and make it available
Confirm the Control Name, Control Type, Description, and Required status.
To activate the custom control, click Back and then select the location the custom control should be active for.
Example: If this custom control should be a Custom Service Field, click Service Custom Fields and activate it there.
Final validation checklist
- Test the control with a non-production or test record when available.
- Confirm required behavior, default values, length limits, and permissions.
- For ComboBox controls, confirm the correct active values appear.
- For Hyperlink controls, open the link.
- For Attachment controls, test that the correct types of files can be uploaded and verify file-size behavior.
- Confirm reports, forms, or templates display the control as expected.
Helpful tips for reliable custom controls
|
Topic |
Recommended practice |
|
Plan before building |
Write the field purpose, data owner, control type, valid values, and retention needs before creating it. |
|
One meaning per control |
Do not reuse an existing control for a new question simply because its type is convenient. |
|
Required data |
Require only information that is consistently available and necessary for the workflow. |
|
Default values |
Use defaults sparingly. A blank value is often safer than a value that could be accepted without verification. |
|
Permissions |
Use Toggle Edit by Permission for sensitive or controlled data, and test each relevant role. |
|
Standardization |
Use ComboBox values for data that must be reported consistently. Keep codes stable even when display wording is refined. |
|
Field names |
Choose names that remain understandable outside the original form, including in exports and reports. |
|
Change management |
Document who approved the control, when it was activated, and how future changes will be handled. |
Before changing an existing control
- Check where the control is currently used.
- Determine whether it already contains client or service data.
- Review any reports, imports, exports, or form logic that depend on it.
- Create a replacement control rather than changing the original meaning.
- For a ComboBox, deactivate obsolete values instead of deleting used values.
|
Important Changes that seem cosmetic—such as renaming a field or value—can affect training materials, report definitions, import templates, and staff workflows. Coordinate changes and test them before release. |
Troubleshooting and common questions
Why can’t I see Custom Control Setup?
Confirm that your user account has permission to access Administrative Options, Custom Features, and Custom Fields. Ask a local administrator to review permissions.
Why does Save fail?
Check required fields, TextBox Length, URL format, attachment extensions and length, and any validation message shown beside the field.
Why does my ComboBox have no choices?
Open the saved definition, click Edit Values, add the Code and Value entries, and make sure the intended values are active.
Why does the new control not appear on a tab or form?
The control must also be activated in the appropriate custom field location.
Why is the Hyperlink rejected?
Enter the complete URL beginning with lowercase http:// or https:// and remove spaces before the scheme.
Why is an attachment rejected?
Confirm its extension or file type is allowed, the file is smaller than the configured maximum size allowed, the required content type exists, the user has permission to upload files, and the user has not exceeded the File Quota for daily uploads.
Why am I seeing the wrong provider’s setup?
Verify if currently logged into Central Administration or a provider by checking in the top banner, then return to the correct provider before making changes.
Why does a renamed field not appear in another list?
Refresh the list using the Resetting the Custom Field List guide or contact Help Desk.
Related CAREWare guides and resources
|
Resource |
Description |
|
Manage ComboBox choices, including adding, editing, activating, and deactivating values. |
|
|
Use custom fields in CAREWare import and export templates. |
|
|
Refresh the custom field list when a new or changed field is not displayed. |
|
|
Instructions for adjusting permission groups and user accounts |
|
|
Guide for understanding and adjusting limits for uploads and reports. |


