
 1321
1321
This document outlines the various steps and options available at the provider map for the data import. To import data to a provider in CAREWare using HL7 feeds, the account needs to be activated, mapped to a provider, and configured to process data. At this stage the interface has already completed the following steps:
-
External Lab data is sent to a folder recognized by CAREWare. It is specified by the common storage entry ‘HL7IncomingMessageFolder’ and is usually not updated. It can be however updated to a different directory only after ensuring that messages from all interfaces are set up to be saved in that folder.
-
An HL7 Message is successfully parsed by CAREWare and has been validated against the set of constraints required by CAREWare.
Upon successful parsing and validation, CAREWare creates an entry for the account identified by the MSH-3 and MSH-6 fields in the MSH segment of the HL7 Message. Once HL7 data is transferred to the location specified, the provider map screen requires users to map and activate those accounts.
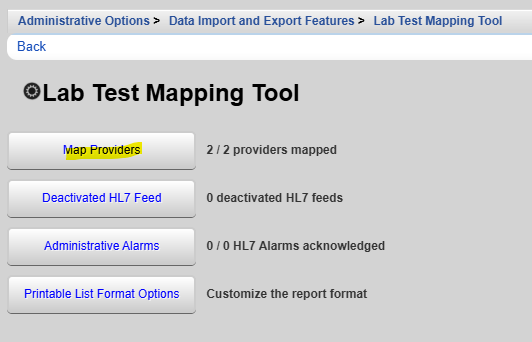
Clicking the Map Providers button in the menu above brings up the screen below.

Here are what the columns on this screen represent:
Account Type – The current type of account that provider is mapped to
MSH3(LabID) – ID code for the exporting lab; usually the sending facility
Matching Value – Matching value for the Provider ID
MSH6(ProviderID) – Imported value for the receiving facility; usually the account identifier associated with the importing agency
Provider – CAREWare Provider the MSH6 value is mapped to
Table Name – Client matching values are stored in this table.
Field Name – Client identifier used for matching client.
Data Source – Type of lab exporting the data.
Threshold – The minimum acceptable client matching score; this value limits potential matches to client records that are similar. The default threshold is 75.
Clicking the provider to highlight it, and then clicking Manage, brings up a short menu:

The first option brings up the following screen:

View Provider Mapping allows users to indicate which provider should receive the results for a specific MSH-6 value and to indicate which field should be used for client mapping. The provider can be mapped to any item in the provider list. For Client Mapping, users first select the table, and if there is only one appropriate field in that table, the Field Name box is populated automatically.

cw_client – Matches clients on URN, which requires the client's first name, last name, DOB, and other identifying information to generate.
cw_map_client_provider – Matches clients on Client ID, which must be populated in CAREWare prior to the import.
cw_client_custom – Matches clients on a selected custom field, which must be populated in CAREWare prior to the import.
If the user chooses the cw_client_custom option, a custom text field should be created prior to the mapping setup, activated on one of the three demographic tabs for the import provider, and set up to be used for looking up patients by setting the Search By column. The Field Name should exactly match the Custom Field name.
In cases when CAREWare cannot automatically match incoming results to a client within the provider, those records are retained for further review by the user. During that review, the user can directly match the client, add a new client record, or update demographic information. Details of the manual client matching process are outlined in another user guide.
The Data Source is used to indicate the type of lab exporting data to CAREWare.

In cases where CAREWare needs to import LabCorp HL7 data nto different providers, it can identify separate domains using the Provider Account value (PID 18 field). This feature only works with LabCorp data. The user fills out the provider mapping as stated in the “Map Provider” section, and when he or she selects LabCorp as the Source, the Provider Account option for domain matching becomes visible. Once this option is checked and saved, CAREWare will use the PID-18 instead of the original MSH-6 for provider mapping.
Find clients across all providers – This option enables searching across all providers in CAREWare, and if a client record is found, it will be added to the import provider automatically. This option should be used with care.
Discard records if no client match – When this option is selected, records without a match are automatically deleted from the queue. This is only recommended if users understand that manual patient matching will not be an option and take steps to sync patient identifiers between CAREWare and the importing application.
The next menu item (when the provider is inactive) is for activating the provider.

Provider Activation requires entering a code that is usually provided by the jProg Implementation specialist. In certain cases, the CAREWare Help Desk also can provide the activation code. Once activation is complete, the Account Type column will include “active” in parentheses.
Once the provider is activated, the second menu item is for formatting the PID-3 value, which is typically used for client matching.

Sites that wish to modify the client identifier value provided in incoming PID-3s before matching clients should start by adding a formatter. Please note that formatting does not modify the value stored in the HL7 message; it is only used for matching clients within the provider.
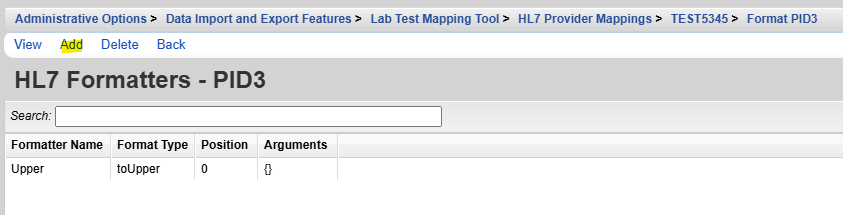
Options include changing letters to uppercase/lowercase, selecting only part of the value, and adding characters to the value.

toUpper – Converts lowercase to uppercase.
toLower – Converts uppercase to lowercase.
SubString – Retains a portion of the text.
PadLeft – Right-aligns value.
PadRight – Left-aligns value.
Remove – Removes all characters from a position.
Replace – Replaces existing text.
Trim – Eliminates white space on both ends.
TrimEnd – Removes trailing white space.
TrimStart – Removes leading white space.
The final menu option is for purging data from the tables where those records are stored while waiting to be imported into client records. (Collectively, these tables are called "the holding tank.")

Purge By Account - Deletes the import records from the holding tank for the selected account. This should be used with great care and with the knowledge that purging is enforced on all import data received for the account. (This action does not affect data already imported into client records.)


