


|
Purpose |
Create and maintain external web links that users can open from the CAREWare main menu. |
|
Who should do this |
CAREWare administrators or designated support staff with access to Central Administration, Administrative Options, and Custom Features. |
|
Use this setup when |
An approved website or resource should be available from the External Links menu. |
|
Main warning |
Main menu links are centrally managed and shared with users. Verify the destination before saving, and never include credentials, tokens, or client identifiers in the URL. |
|
Video walkthrough |
Quick path
Central Administration > Administrative Options > Custom Features > Main Menu Link Management > Add
Before you begin
- Confirm that the top banner shows Central Administration.
- Prepare approved Link Text, a clear Description, and the complete destination URL.
- Use https:// whenever the destination supports it, and open the site in a browser before adding it.
- Confirm the link is appropriate for the users and providers that may see it.
|
Important Use durable link text and coordinate changes before renaming or deleting an established link. A main menu link may be part of training materials and routine staff workflows. |
Open Main Menu Link Management
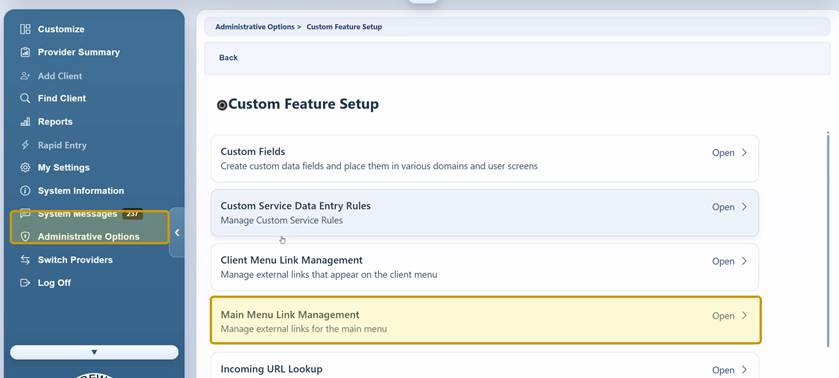
Step 1. Click Administrative Options.
Step 2. Click Custom Features.
Step 3. Click Main Menu Link Management.
|
Tip Complete this setup in Central Administration so the link can be managed as a shared main-menu resource for providers. |
Add an external link
Step 4. On the Main Menu External Links list, click Add.
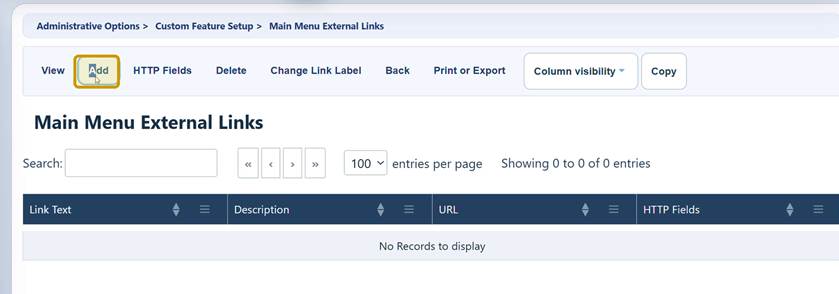
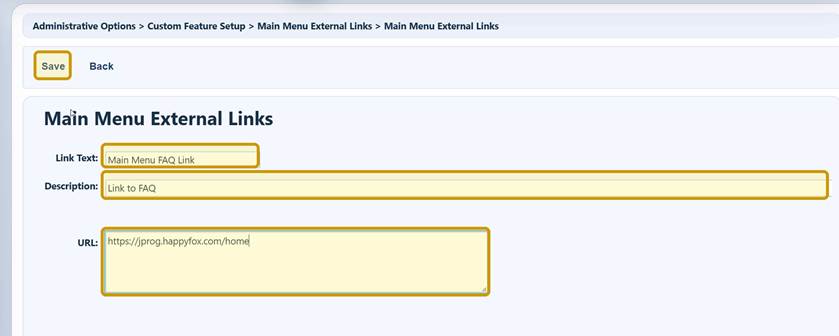
Step 5. Enter concise Link Text that users will recognize.
Step 6. Enter a Description that explains the destination.
Step 7. Enter the complete URL, beginning with lowercase https:// or http://.
|
Important Prefer https:// when available. Do not place usernames, passwords, access tokens, client identifiers, or other sensitive values in the URL. |
Save and confirm the link
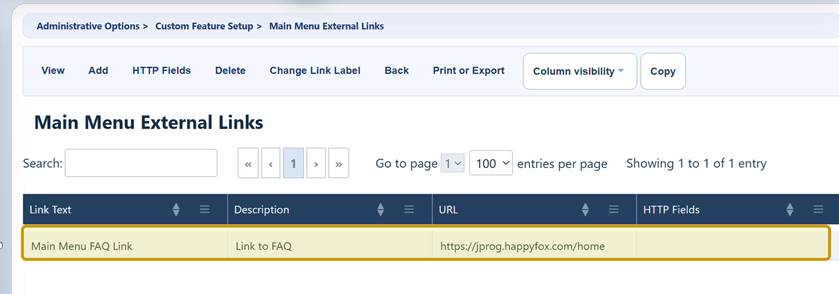
Step 8. Click Save.
Step 9. Confirm that the Link Text, Description, and URL appear in the list.
Review before release
- Check spelling and capitalization in the Link Text.
- Confirm the Description is useful to staff and does not include confidential information.
- Open the URL independently and confirm that it resolves to the intended site.
|
Tip A clear, stable label is easier to recognize in the External Links menu and remains understandable in training materials. |
Verify the link from a provider
Step 10. Click Switch Providers.
Step 11. Select a provider, then click Switch Providers.
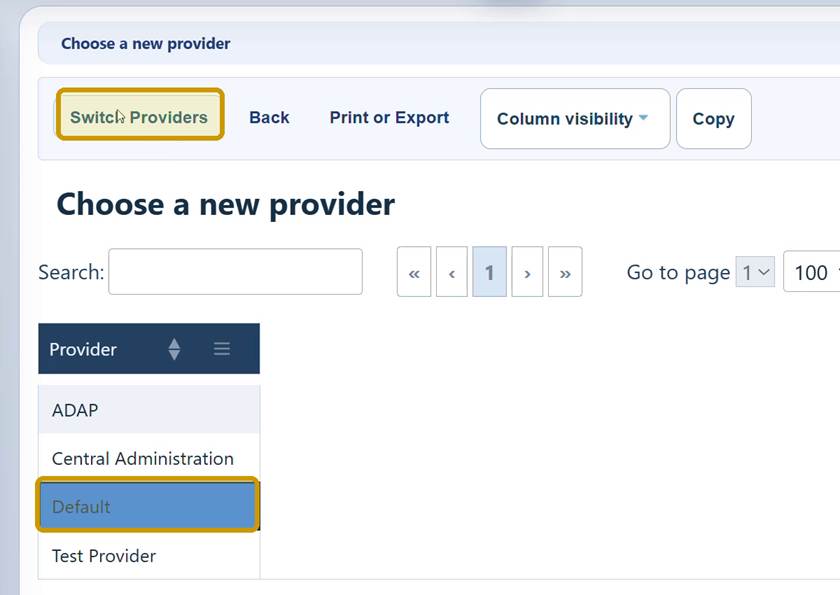
Step 12. Click External Links in the main menu.
Step 13. Click the new link.
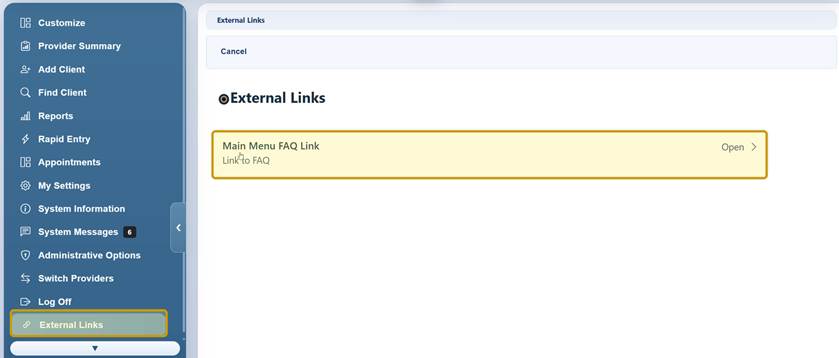
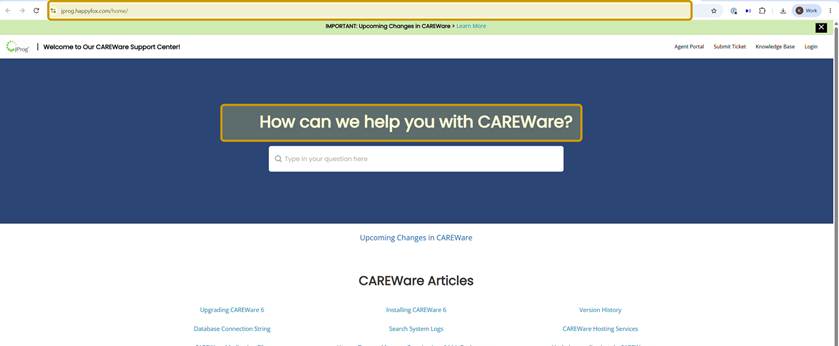
Step 14. Confirm that the intended destination opens.
Main Menu External Links buttons
|
Button |
What it does |
When to use it |
|
View |
Opens the selected link record. |
Review an existing link before changing it. |
|
Add |
Creates a new external link. |
Add an approved shared resource. |
|
HTTP Fields |
Opens the HTTP field settings for the selected link. |
Use only when the destination requires an approved HTTP-field configuration. |
|
Delete |
Removes the selected link from the list. |
Use only after confirming staff no longer need it. |
|
Change Link Label |
Changes the label shown for the selected link. |
Refine the user-facing menu label without changing the destination. |
|
Back |
Returns to Custom Feature Setup. |
Leave the Main Menu External Links list. |
|
Print or Export |
Prints or exports the grid. |
Document or review configured links. |
|
Column visibility |
Shows or hides optional columns. |
Simplify the list or display more details. |
|
Important Deleting or renaming a shared link can disrupt staff workflows. Confirm ownership, communicate the change, and test the updated menu before release. |
How to confirm it worked
- The link appears in the Main Menu External Links list with the correct text, description, and URL.
- External Links appears in the provider menu for an intended user role.
- The new link appears in the External Links list.
- Selecting the link opens the approved destination without an error or unexpected redirect.
- The link remains available after signing out and returning to the provider.
Helpful tips for reliable main menu links
|
Topic |
Recommended practice |
|
Link text |
Use a concise, durable label that clearly identifies the destination. |
|
Description |
Explain what the site provides and why staff may need it. |
|
URL |
Enter the complete address with lowercase http:// or https://; prefer HTTPS. |
|
Security |
Do not include credentials, tokens, client identifiers, or other sensitive values. |
|
Testing |
Open the destination before release and retest after any change. |
|
Visibility |
Review Menu Item Customization and user permissions when access should differ by role. |
|
Change management |
Document the link owner, approval, activation date, and future changes. |
|
Important Changes that appear cosmetic, such as renaming a link, can affect training materials, instructions, and staff workflows. Coordinate and test changes before release. |
Troubleshooting and common questions
Why can’t I see Main Menu Link Management?
Confirm that the account can access Central Administration, Administrative Options, and Custom Features. Ask a local administrator to review the applicable permissions.
Why does Save fail?
Complete Link Text, Description, and URL. Verify the URL begins with http:// or https://, remove leading spaces, and review any validation message beside the field.
Why doesn’t External Links appear in the provider menu?
Confirm the link was saved, refresh the provider session, and review Menu Item Customization and the user’s permissions.
Why doesn’t the link open?
Open the URL directly in a browser, check for typing errors or an unavailable destination, and confirm the site does not require unsupported or expired access information.
Why do users see an outdated label?
Return to Main Menu Link Management, select the link, update the label or details, save, and refresh the provider session.
Related CAREWare guides and resources
|
Resource |
How it helps |
|
Set up and open shared external links from the CAREWare main menu. |
|
|
Control which menu items are visible for users and groups. |
|
|
Review user access, provider assignments, and permissions. |
|
|
Manage permission sets for users who perform similar roles. |
|
|
Review URL safety, naming, testing, and change-management guidance. |


