


|
Purpose |
Set matching, updating, value handling, service options, ADAP options, and automation behavior before importing data. |
|
Who should do this |
CAREWare administrators and data managers who configure provider import sources. |
|
Use Import Settings when you need to |
Create or edit the rules that CAREWare uses when validating and processing PDI records. |
|
Main warning |
Import Settings directly affect whether clients are added, matched, updated, skipped, or processed automatically. |
|
Quick path Administrative Options > Data Import and Export Features > Provider Data Import > Import Settings |
Before you begin
- Know the provider, Source Name, and Source Type for the import.
- The Source Name should match the data source name in the exp_provider table of the import file.
- Review the settings before running a production import or enabling automation.
|
Important The provider name and source name under import settings must match the prv_name and prv_source value in the exp_provider.csv file included in the zipped folder of imports in order for these import settings to be used for that import. |
|
Tip Use Copy Mappings when a similar source has already been mapped for another provider or import source. |
Access PDI Import Settings
1. Click Administrative Options.
2. Click Data Import and Export Features.
3. Click Provider Data Import.
4. Click Import Settings.
5. Select the source.
6. Click Edit.
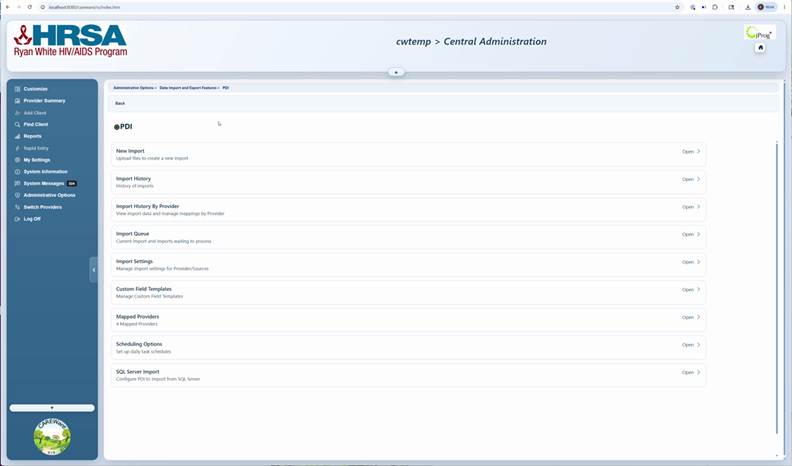
Provider Data Import menu
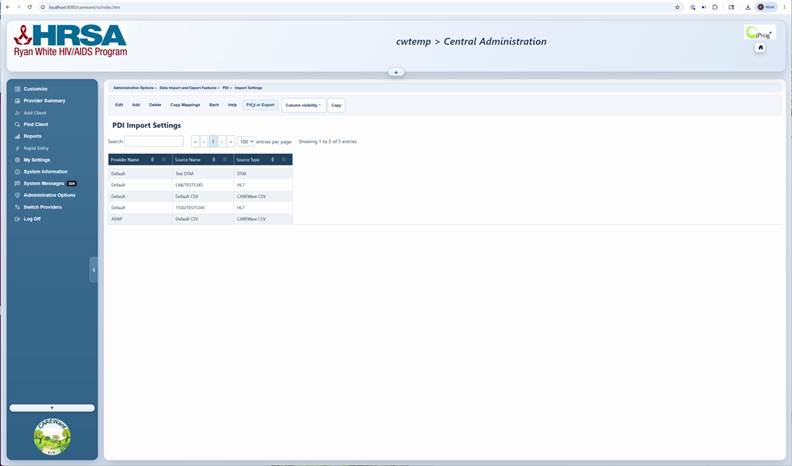
PDI Import Settings list
Source Types
|
Source Type |
Description |
Key Requirements |
|
CAREWare CSV |
Standardized comma-separated files utilizing the CAREWare template. |
Requires both client and provider data tables; service imports need exp_services and exp_provider. |
|
DTM |
Files adhering to CSV specifications generated within the Data Translation Module. |
Allows mapping external data columns directly to CAREWare CSV template fields. |
|
FHIR |
Healthcare data imported via the Fast Healthcare Interoperability Resource standard in JSON format. |
Follows FHIR standard. |
|
HL7 |
Import files that conform to established Health Level 7 formatting standards. |
Follows HL7 formatting standards. |
|
SQL PDI |
Data pulled from the cw_pdi SQL Server database. |
Utilizes a table structure identical to the legacy MDB template.\ |
Add new Import Settings
1. Click Add.
2. Select the Provider Name.
3. Select the Source Type.
4. Enter a Source Name.
5. Click Next.
6. Review and save the new settings before importing.
Settings Options
|
Setting group |
What it controls |
Helpful warning |
|
Adding New Clients |
Whether unmatched incoming clients are added automatically or manually. |
Manual mode requires users to add or match new clients. |
|
Client Matching |
Whether matching uses eUCI, Client ID, custom field, State No, or legacy URN elements. |
The matching value must be in the Match ID column when required. |
|
Updating Demographics |
Whether CAREWare updates existing demographics. |
Blank incoming values do not delete existing values. |
|
Service Matching |
Standard, Always Add, Service PK, or custom field matching. |
Always Add may create duplicate services. |
|
Provider Data Options |
Automatic processing, value matching, setup data import, and holding tank cleanup. |
Delete Completed Records removes successful holding tank records after processing. |
Adding New Clients
- Automatically add new clients (Default): Unmatched incoming client records are added to the system automatically during the import process.
- Manually add new clients: Existing records are updated if a match is found. Unmatched records are held for manual review, matching, or addition by the user.
Client Matching
- Client eUCI (Updated/Legacy): Matches records using the encrypted unique identifier. CAREWare performs an exact match if the eUCI is in the Match ID column and URN fields are empty.
- Client ID: Matches based on the specific provider ID assigned by the user.
- Custom Field: Matches using a selected provider custom field. CAREWare looks for this value in the Match ID column of the source file.
- State No (eHARS): Matches using the eHARS identifier provided in the Match ID column.
- Legacy URN Elements: Matches records using the standard unique identifier generated from name, birth date, and demographic data.
|
Note The Match ID column must contain the Client ID. Values in the cln_client_id column of the exp_client table are used for updates rather than matching. |
Updating Client ID
- Always update for non-null values: Overwrites existing Client IDs with any values provided in the cln_client_id column.
- Only update Client ID if new Client ID in import and currently NULL in CAREWare: Only adds the ID if the field is currently empty for that provider.
- Never update Client ID in CAREWare from import: Disregards any Client ID values present in the source file.
Updating Demographic Data
- Always update (Default): Synchronizes existing demographic fields with all incoming record values.
- Never Update: Prevents incoming data from modifying existing demographic records.
- Update only for NEW clients: Only sets demographics for records added during the current import; existing clients remain unchanged.
- Only update new values: Updates existing clients only if the incoming data differs from the most recent import for that provider.
|
Tip Regardless of the selected update option, blank incoming values will never overwrite or delete existing data in CAREWare. |
Update Race, Risk Factors, or Insurance Types
- Always update (Default): Synchronizes current system values with the incoming data for these fields.
- Never Update: Retains existing record values and ignores any incoming changes.
- Update only for True values: Only modifies records when the incoming import data is marked as True.
ADAP Import Options
Handling Insurance
Determines if the client's insurance assessment should be updated based on an incoming drug payment record.
- Do not use insurance: Skips all insurance checks and leaves the existing client assessment unchanged.
- Use the insurance type from incoming record: Automatically adds or updates the insurance assessment using the value provided in the import record.
- Use the client's current insurance type: Verifies if a valid assessment exists in the system without adding or modifying any insurance data.
Block Duplicate Rows
When enabled, CAREWare blocks imports with duplicate record content or identical file names.
|
Note Enabling this may cause files to be purged from the list without a user prompt. |
Days to Block Duplicate Rows
Defines the timeframe for allowing similarly named files to be processed, which is useful for annual or quarterly imports.
Number of Days used to determine drug overlap
Prevents importing drug payment records if they fall within a specified date range of an existing entry. If set to 0, overlap detection is disabled. Detected overlaps will be flagged as follows:
Service Options
Service Matching
- Standard: Identifies matches using the subservice code, service date, provider, and client. It prevents duplication within the specific file by ensuring the system records reflect the exact services imported, regardless of how many times the file is processed.
- Always add: Creates new entries in CAREWare for every service record contained in the source file.
- Service PK: Synchronizes records by matching the primary key (srv_pk) values.
- Match on custom field: Uses specified service custom fields for matching. Users must select and save these fields via the Configure Service Matching Custom Fields menu.
|
Note Utilizing this option can result in the creation of duplicate service records. |
Provider data options
- Automatically Process Imports processes records that are ready to process without a manual click.
- Match CAREWare Values assumes incoming referential values already match CAREWare values.
- Automatically Import Setup Data imports metadata tables such as contract, clinical, and custom setup information.
- Delete Completed Records after Process purges successfully imported holding tank records after processing.
How to confirm it worked
1. Return to Import Settings and confirm the source appears in the list.
2. Upload a small test import with the matching Source Name.
3. Open Import History and confirm the expected source type and provider were used.
Troubleshooting and common questions
A file did not use the settings I expected. What should I check?
Confirm the Source Name in exp_provider matches the Source Name in Import Settings.
Why did duplicate services appear?
Review Service Matching. Always Add imports all service rows and can create duplicates.
Related guides
|
A general guide to the Provider Data Import process. |
|
|
Guide on initiating a new data import. |
|
|
Details on viewing and checking past import results. |
|
|
Information on configuring and using automated import processes. |
|
|
Guide for importing data specifically from a SQL Server source. |
|
|
Details on using and setting up templates for custom fields during import. |


