
 2529
2529
Import History
|
|
|
Purpose |
Use Import History and Import Details to manage imported records after upload and provider mapping. |
|
Who should do this |
CAREWare administrators and data managers who review and process PDI imports. |
|
Use Import History when you need to |
Review import status, inspect errors, complete mappings, match clients, and process records. |
|
Main warning |
Undo Import deletes records processed from that import. Delete Import removes temporary import process records, not processed client records. |
|
Quick path Administrative Options > Data Import and Export Features > Provider Data Import > Import History. |
Before you begin
The import file must be uploaded and mapped to a provider before it appears in Import History.
Know whether you are reviewing errors, processing ready records, or undoing a completed import.
Export or document the history list before major cleanup actions.
|
Important Purge Unmapped Values starts immediately and deletes records in the holding tanks for unmapped values. If used accidentally, the file must be imported again to complete those mappings. |
Access Import History
1. Click Administrative Options.
2. Click Data Import and Export Features.
3. Click Provider Data Import.
4. Click Import History.
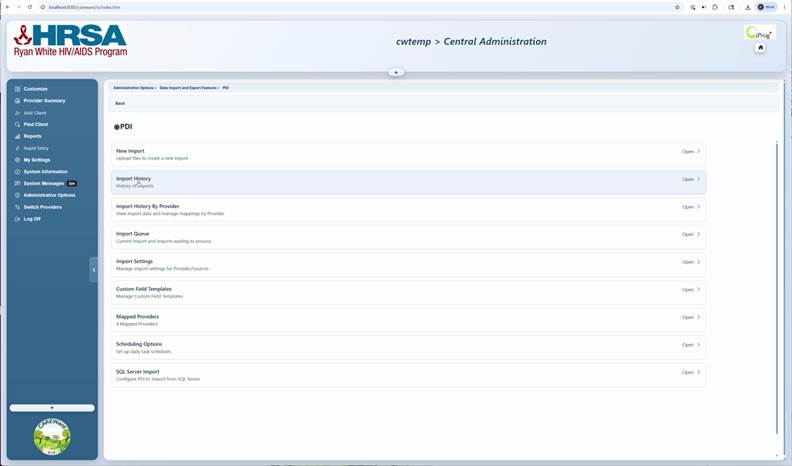
PDI Import History screen
Process an import file
1. Click the file to select it.
2. Click Import Details.
3. Review record types with errors, missing mappings, or ready-to-process counts.
4. Resolve errors, mappings, and client matching.
5. Click Recheck Import.
6. Click Process Import when records are Ready to Process.
PDI Import Details screen.
Import Details options
|
Option |
What it does |
Use it when |
|
Error Details |
Shows error messages and record keys. |
You need to understand why records cannot process. |
|
Status Log |
Lists individual holding tank records and imported values. |
You need to see what the record looks like in the holding tanks. |
|
Edit Mappings |
Maps incoming values to CAREWare values. |
A CAREWare Value is blank or mismatched. |
|
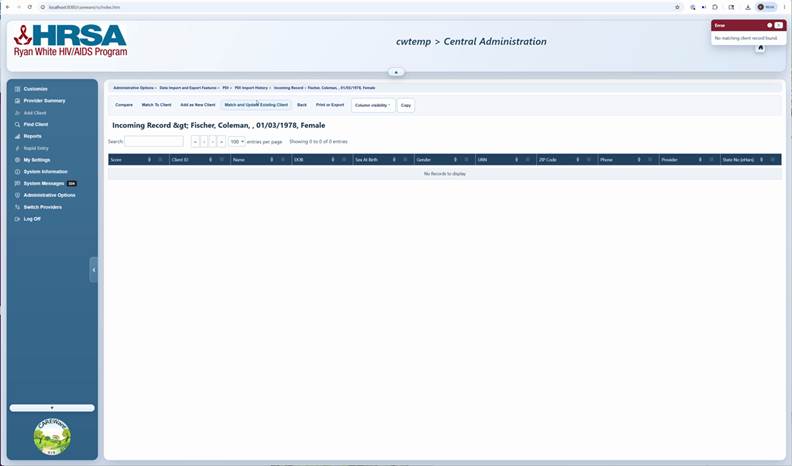
Manual Client Matching |
Matches incoming clients to existing clients or adds a new client. |
Client records need manual review. |
|
Recheck Import |
Validates unresolved records again. |
You have resolved mappings or matching issues. |
|
Process Import |
Adds Ready to Process records to CAREWare. |
Review is complete and records are ready. |
|
Purge Unmapped Values |
Deletes records with unmapped values from holding tanks. |
Those unmapped records are never to be processed, so it is better to remove them. |
Common statuses
- Ready to Process means records are ready to enter CAREWare.
- Processed means CAREWare entered all records it could process.
- Undone means processed records and holding tank records for that import were deleted.
- Error adding import or Error in DTM process requires additional log or source setting review.
- Domain mapping and re-upload required means provider mapping must be completed and the import uploaded again.
How to confirm it worked
- The Record Count shows the expected processed/total counts.
- Import Details shows no unexpected errors or missing mappings.
- Client records contain the expected imported data after processing.
Troubleshooting and common questions
Why does Error Details show a Record PK that is not in my CSV?
CAREWare creates temporary holding tank primary keys during import. Use Status Log to find the CSV row and imported values.
Why did resolving clients reduce other errors?
Service and other client-level records often fail until the incoming client is matched or added.
Related guides
|
Guide |
Description |
|
Configures settings for the provider and Source Name before uploading a file. |
|
|
Allows confirmation of uploaded files (provider, source, status) and review of import details, errors, and mappings. |
|
|
The overall feature for managing provider data imports (PDI) and creating new imports. |
|
|
Guidance for automating the import process. |


