


|
Purpose |
Activate existing custom controls for service records and define whether each field applies to all services, selected service categories, or selected subservices. |
|
Who should do this |
CAREWare administrators, data managers, or designated support staff with access to Administrative Options and Custom Fields. |
|
Use this setup when |
You need to activate, scope, reorder, or deactivate custom fields used during service entry. |
|
Main warning |
Confirm the correct provider and activation scope. A required field can affect every selected service workflow and service import. |
|
Video walkthrough |
Quick path
|
Administrative Options > Custom Features > Custom Fields > Service Custom Fields > select provider > Manage Selected Provider |
Before you begin
● The custom control definition must already exist in Custom Control Setup.
● Confirm whether the field should apply to all services, one or more service categories, or specific subservices.
● For a ComboBox, confirm that the intended values are active before staff begin data entry.
● Use a test or non-production record when available.
|
Important Creating a custom control definition and activating it for services are separate tasks. Refrain from repurposing controls after they contain data; create a replacement when the business meaning changes. |
Open Service Custom Fields
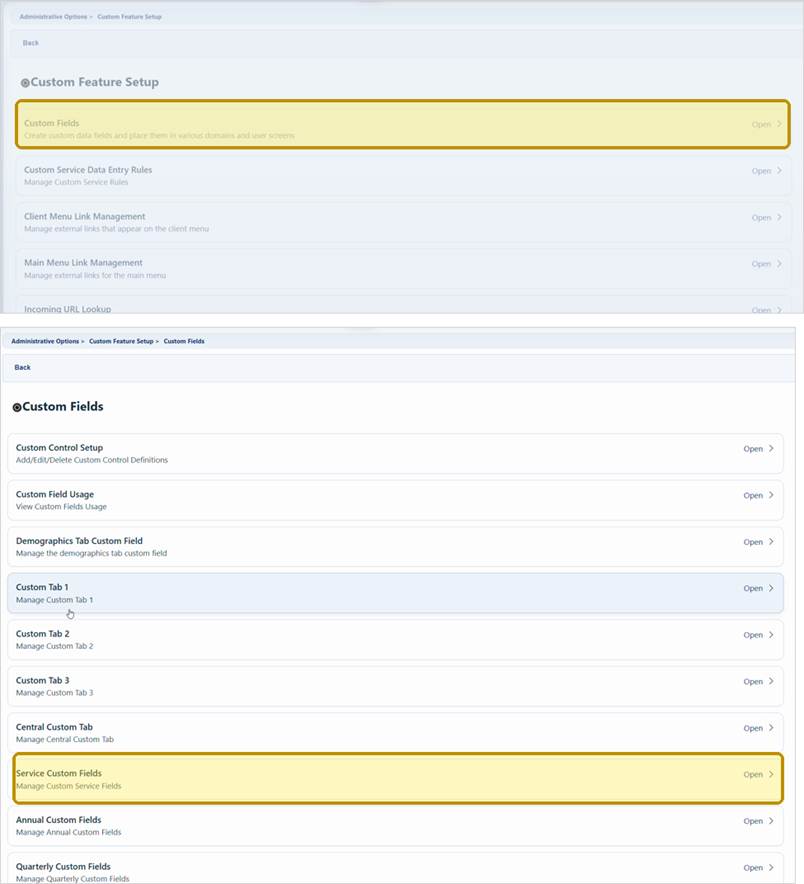
Step 1. Click Administrative Options.
Step 2. Click Custom Features.
Step 3. Click Custom Fields.
Step 4. Click Service Custom Fields.
Select the provider
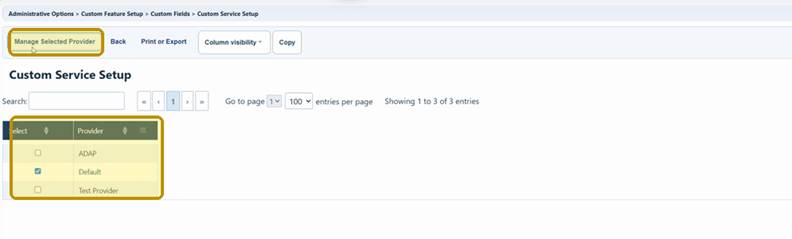
Step 5. In Central Administration, select the provider and click Manage Selected Provider. If you are already inside one provider, skip this step.
|
Important Changes apply to the selected provider. Verify the provider before activating, deactivating, or reordering service custom fields. |
Activate a field for all services
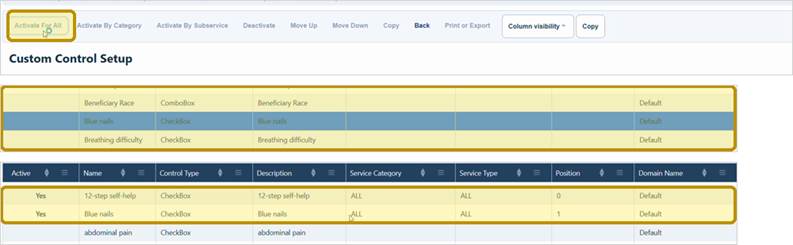
Step 6. Enter part of the control name or description in Search, then select the control.
Step 7. Click Activate For All.
|
Important Use Activate For All only when the field is appropriate for every service. Required fields and default values apply wherever the control is active, including service imports. |
Activate a field by service category
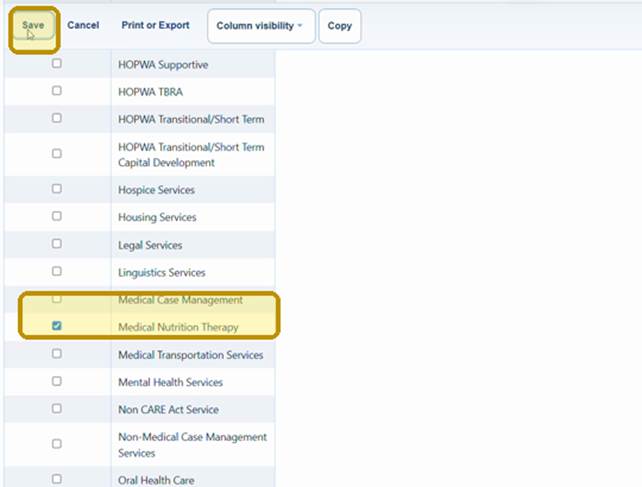
Step 8. Select the control and click Activate By Category.
Step 9. Select each service category where the field should appear, then click Save.
|
Important Select only categories that share the same data requirement. A field activated by category appears for every applicable subservice in that category. |
Activate a field by subservice
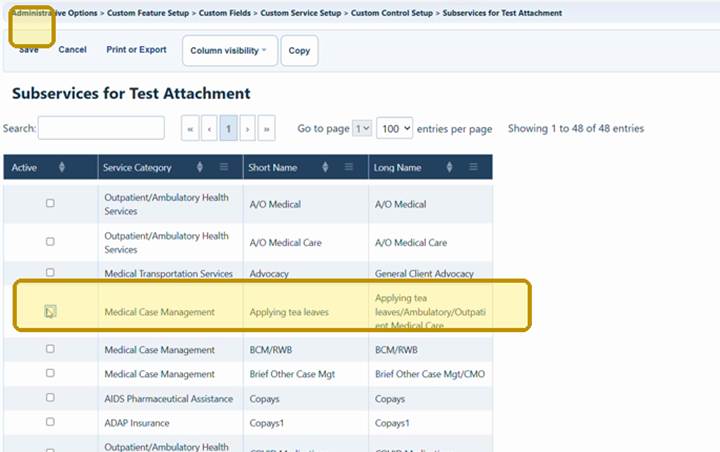
Step 10. Select the control and click Activate By Subservice.
Step 11. Select each subservice where the field should appear, then click Save.
|
Tip Use subservice activation when the field is needed only for a narrowly defined service workflow. |
Review scope and field order
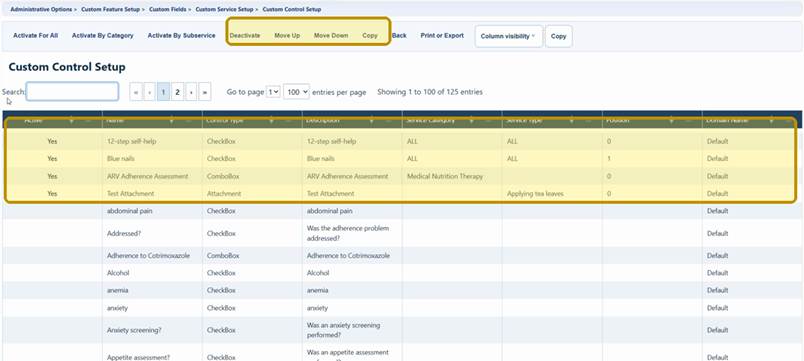
Step 12. Confirm Active displays Yes and review the Service Category and Service Type columns.
Step 13. Select an active field and click Move Up or Move Down until it appears in the preferred order.
Service Custom Fields buttons
|
Button |
What it does |
When to use it |
|
Activate For All |
Activates the selected control for every service category and subservice. |
Use only when the field applies to all service entry workflows. |
|
Activate By Category |
Opens the service category selection list. |
Use when the field applies to all subservices in selected categories. |
|
Activate By Subservice |
Opens the subservice selection list. |
Use when the field applies only to specific subservices. |
|
Deactivate |
Removes the selected activation from service entry. |
Use to stop displaying the field without deleting its definition or historical data. |
|
Move Up / Move Down |
Changes the field position for its activation scope. |
Use after activation to place fields in a logical entry order. |
|
Back |
Returns to the provider selection page. |
Use when changing providers or leaving setup. |
|
Print or Export |
Opens options to print or export the grid. |
Use for review, documentation, or change control. |
|
Column visibility |
Shows or hides grid columns. |
Used to alter columns in list |
Deactivate a service custom field
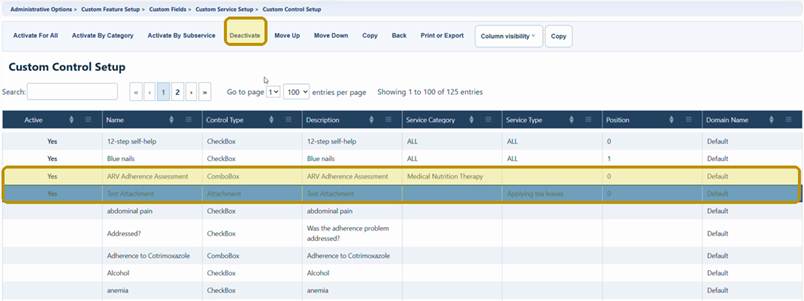
Step 14. Select the active field and click Deactivate.
|
Important Deactivation does not delete the custom control definition or historical service data. Review reports, imports, exports, forms, and staff workflows before changing an existing control. |
How to confirm it worked
● Open service entry for a test client in the selected provider and choose a service within the configured scope.
● Confirm the field appears in the intended order and does not appear for services outside the selected scope.
● Verify required behavior, default values, length limits, permissions, and active ComboBox values.
● For an Attachment control, verify permitted file types, file size, content type, and upload permissions.
Helpful data-quality tips
● Use a ComboBox for standardized values that must be counted, grouped, or reported consistently.
● Use a DatePicker for dates and keep identifiers as text when leading zeros or punctuation must be preserved.
● Use default values sparingly; a blank value is safer than an incorrect value accepted without review.
● Use an attachment custom control if documents need to be uploaded and attached to the service.
|
Important Changes that appear cosmetic, including renaming a field or value, can affect training materials, custom field templates, reports, imports, and staff workflows. Coordinate and test changes before release. |
Troubleshooting and common questions
Why does the field appear for the wrong services?
Review the Service Category and Service Type columns. Deactivate the incorrect activation, then activate the field again using the correct scope.
Why does service entry or an import fail?
Review whether the custom field is Required, whether a valid value was supplied, and whether the field is active for the imported service scope.
Why does a ComboBox have no choices?
Open Custom Control Setup, click Edit Values, add or review the values, and activate the intended choices.
Related CAREWare guides and resources
|
Resource |
How it helps |
|
Add or edit custom controls to be activated as service custom fields |
|
|
Add drop down list items to combobox custom controls |
|
|
Create and maintain the subservices used for subservice-scoped activation. |
|
|
Change user permissions by group |


