1185
1185
For CAREWare to convert imported data into the correct format and location in the CAREWare database, users need edit the field mappings. The field mappings ensure CAREWare correlates data in one column of the import file with a specific column in the actual database.
For example, a user is importing a client's zip code. The import file has the client's zip code in column three with the header Zip Code. In CAREWare, ZIP Code is stored in the column with the header cln_zip. By setting the column Zip Code in the import file to map to the cln_zip column in the database, CAREWare will correctly update the ZIP code in the client record. The mappings are retained in the import holding tanks and are applied to future imports as long as the column order and column name in import files remain unchanged.
- Upload Sample File for Field Mappings
- Complete the Field Mappings
- Import the DTM File
- Considerations for Field Mappings
Upload Sample File for Field Mappings
The first step in mapping the fields involves uploading a sample file that represents the standard format of all imports. The file should include the headers in the specific order. Alternatively, users can upload sample files without headers and a single row of data. CAREWare uses the sample file to generate a list with the data or column headers in that order, and the list is used to map the fields.
Note: If there are any changes to the import file after the initial field mappings are completed, such as changes to headers or column order, a new sample file needs to be uploaded, and the field mappings need to be completed again.
Field mappings are most used with DTM imports. After adding a DTM Spec, the DTM Spec can be configured by setting the field mappings.
1. Click the Spec Name to highlight it.
2. Click Edit Field Mappings.
3. Click Upload Sample CSV Source File.
Note: A Sample CSV Source File is a template of the imported client data that contains the same columns as the import file. Uploading the Sample CSV Source File populates a list of columns from the import files to be matched with CAREWare template fields.
4. Click Choose File.
5. A new window for the Windows File Explorer opens. Select the sample file, and click Open.
6. The name of the sample file appears next to Choose File. Click Process File.
Note: Use the correct delimiter when uploading your files. In the screenshot above, the delimiter is a comma. The delimiter any character used to separate records as separate columns. If a client record is listed in a text document with the client's specific identifying information (i.e., URN fields), then the delimiter should be a comma. Other delimiters can be used if that is how the data is formatted.
7. The DTM Spec Mappings appear in list format.
Select Template Field – Opens the list of CAREWare fields for mapping the Source File Header or Example.
Configure – Settings for the Source File mapping, which includes Match Types to create unique functions.
Add – Adds a blank Source File Header or Example, which can be configured with unique functions.
Delete – Removes the mapping to the Template Field or deletes an added row.
Upload Sample CSV Source File – Uploads a template of the import file for mapping the columns to CAREWare fields.
Back – Returns to the Configure DTM Specs window.
Print or Export – Exports the list of mappings.
Hide/Show Columns – Columns can be unchecked to remove them from the screen or checked to add them.
Complete the Field Mappings
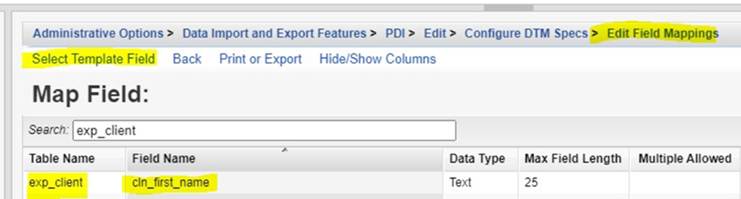
1. Click the source file header or example to highlight it and click Select Template Field.
2. Locate the corresponding CAREWare field in the list, highlight it, and click Select Template Field.
Note: The list of field names can be shortened by using the Search field to look for related terms. Example: In this case, using the terms exp_service, srv_date, or date reduces the number of possible fields in the list.
The column from the import file is now mapped to the corresponding field in CAREWare. Any future imports using the DTM spec will automatically follow the mapping methodology.
Repeat steps 1 and 2 to complete the mappings for the sample file.
Import the DTM File
Once the mappings are complete, client level data can be imported using the DTM settings and DTM Spec that was created.
To begin importing records using this configuration, follow the instructions here for importing DTM files.
Considerations for Field Mappings
- New Clients - New clients can be added from records other than exp_client. However, URN fields are required within the record to add new clients. When matching these URN fields, make sure to match them to exp_client.
- Client ID Matching - If matching by Client ID, a custom field, or EHARS State ID, make sure to use the corresponding match_id based on the record being imported. If exp_service is being imported, for example, then match the Client ID with the match_id of exp_service.