


|
|
|
Purpose |
Configure a provider's Custom Tab 1, 2, or 3, including the tab name, data entry mode, active custom controls, order, search behavior, and Rapid Entry visibility. |
|
Who should do this |
CAREWare administrators, data managers, or designated staff with access to Administrative Options and Custom Fields. |
|
Use this guide when you need to |
Create, rename, hide, make read-only, or update the controls displayed on a custom client tab. |
|
Main warning |
A control may already be assigned to another custom tab. Move or reuse it only after confirming the change will not disrupt an existing workflow. |
|
Video walkthrough |
|
Quick path Administrative Options > Custom Features > Custom Fields > Custom Tab 1, Custom Tab 2, or Custom Tab 3 > select provider > Manage Selected Provider |
Before you begin
- Create the needed control definitions in Custom Control Setup before activating them on a client tab.
- Confirm the provider or Central Administration domain shown in the top banner.
- Decide the tab name, data entry mode, control order, search fields, and Rapid Entry fields before making changes.
- Review whether a control is already active on another custom tab.
|
Important A custom control must be activated on a custom client tab for it to appear. Activation and placement are completed separately. Refrain from repurposing controls after they contain production data; create a new control when the business meaning changes. |
Choose the data entry mode
The Data Entry Mode controls whether the tab is visible and whether users can edit its fields.
|
Mode |
What it does |
Use it when |
|
Hidden |
Removes the tab from the client record menu. |
The tab is not ready for use or should be temporarily unavailable. |
|
Normal Data Entry |
Displays the tab and allows editing subject to the user's permissions. |
Staff must enter or update information on the tab. |
|
Read Only |
Displays the tab without allowing normal data entry. |
Staff should view the information but not change it from the tab. |
|
Tip Use a concise, durable tab name that remains understandable in training, reports, templates, and staff workflows. Coordinate name changes before release. |
Open the Custom Client Tab setup
Step 1. Click Administrative Options, then click Custom Features.
Step 2. Click Custom Fields.
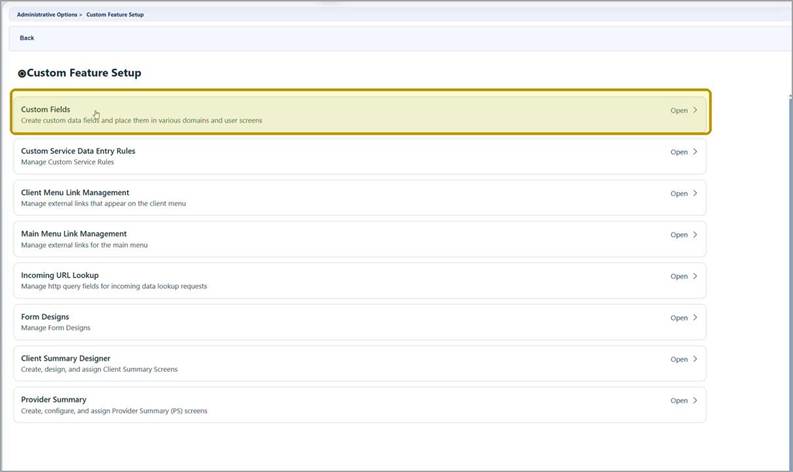
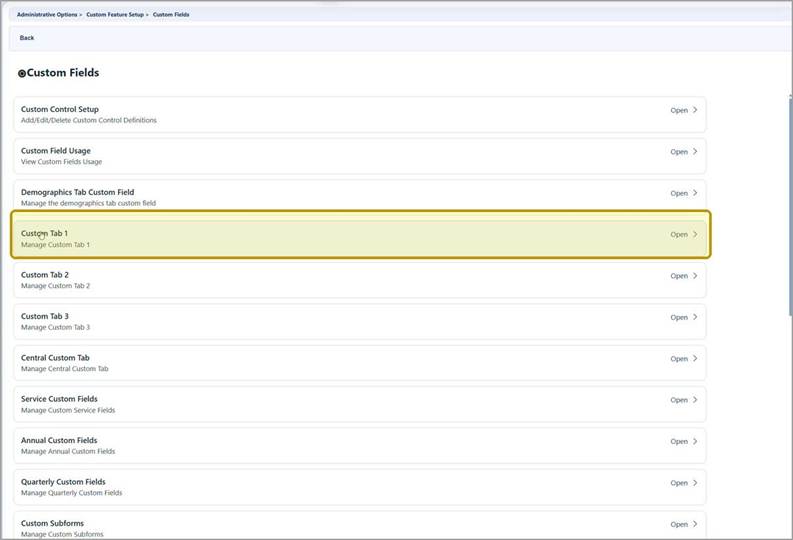
Step 3. Click Custom Tab 1, Custom Tab 2, or Custom Tab 3.
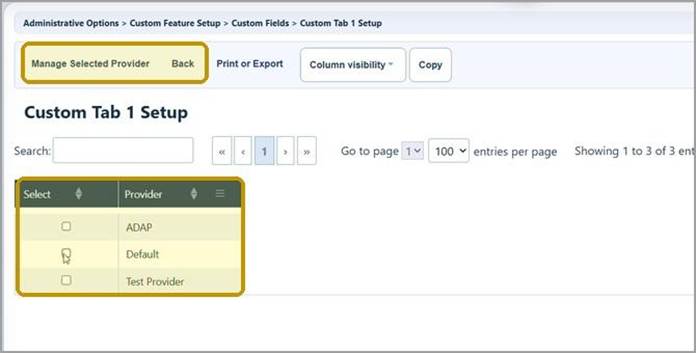
Select the provider and open the tab settings
Step 4. In Central Administration, select the provider and click Manage Selected Provider. Inside a provider, skip this step.
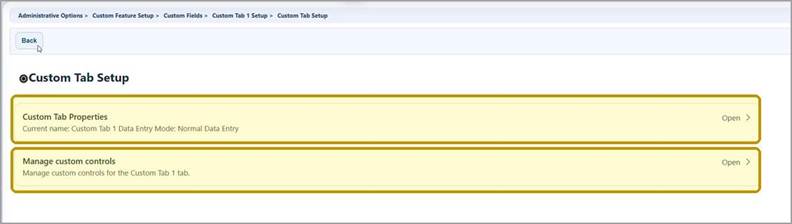
Step 5. Open Custom Tab Properties to change the tab name or data entry mode.
Step 6. Open Manage custom controls to activate, remove, or arrange fields.
|
Important Make provider-specific changes in the intended provider. Confirm the top banner and selected provider before saving. |
Name the tab and select its mode
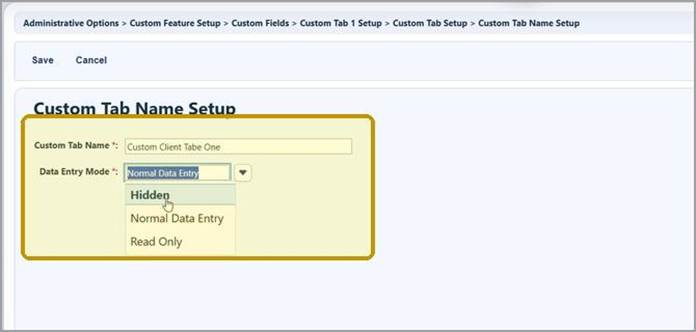
Step 7. Open Custom Tab Properties, then click Edit.
Step 8. Enter the Custom Tab Name and select the Data Entry Mode.
Step 9. Click Save.
Activate custom controls
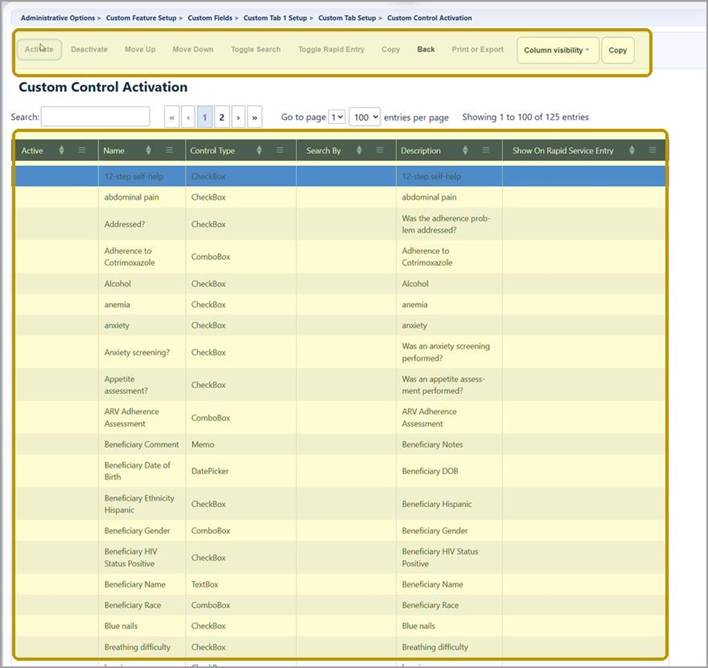
Step 10. Open Manage custom controls.
Step 11. Select a control and click Activate.
Step 12. Repeat for each control that should appear on the tab.
|
Important If CAREWare displays “The field is already activated for another Custom Tab,” stop and confirm where the field is currently used. Deactivate it from the other tab only when the move is intentional. |
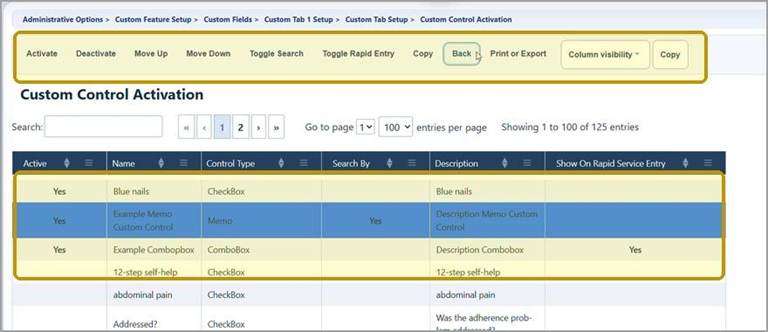
Activated controls display Yes in the Active column and move to the top of the list.
Arrange controls and configure optional behavior
Step 13. Select an active control and use Move Up or Move Down to set its display order.
Step 14. Use Toggle Search only for fields that should help staff find clients.
Step 15. Use Toggle Rapid Entry only for fields that should appear during Rapid Service Entry.
Step 16. To remove a field from the tab, select the active control and click Deactivate.
Custom Control Activation buttons
|
Button |
What it does |
Use with care |
|
Activate |
Adds the selected control to the custom client tab. |
A control may only be active in one custom client tab location at a time. |
|
Deactivate |
Removes the control from this tab. |
Confirm the field is not required by the current workflow. |
|
Move Up / Move Down |
Changes the order of active controls. |
Keep related fields together and use a logical entry order. |
|
Toggle Search |
Adds or removes the field as a client search option. |
Use only fields that reliably identify or narrow client results. |
|
Toggle Rapid Entry |
Shows or hides the field in Rapid Service Entry. |
Limit the screen to fields needed during rapid entry. |
|
Back |
Returns to Custom Tab Setup. |
Use after reviewing the active fields and options. |
Tips for reliable custom client tabs
|
Topic |
Recommended practice |
|
Plan before activation |
Document the tab purpose, data owner, control types, valid values, order, permissions, and retention needs. |
|
One meaning per control |
Do not reuse an existing control for a different question. Create a replacement control when the meaning changes. |
|
Required fields |
Require only information that is consistently available and necessary for the workflow. Required settings apply wherever the control is activated. This affects imports as well. |
|
Default values |
Use defaults sparingly. A blank value is safer than a value staff may accept without verification. |
|
Countable data |
Use ComboBox or other structured controls for information that must be grouped, counted, or reported consistently. |
|
Narrative data |
Use Memo for longer notes and explanations. |
|
Identifiers |
Use a text TextBox for IDs, ZIP codes, phone numbers, or codes that may contain leading zeros or punctuation. |
|
Dates |
Use DatePicker instead of free text so CAREWare can enforce a valid date format. |
|
ComboBox values |
Use stable codes and deactivate used values instead of deleting them. |
|
Permissions |
Test each relevant role, especially when Toggle Edit by Permission is enabled on a control. |
|
Important Changes that seem cosmetic, including renaming a tab, control, or ComboBox value, can affect training materials, reports, imports, exports, templates, and staff workflows. Coordinate and test changes before release. |
Troubleshooting and common questions
Why can’t I see Custom Tab 1, 2, or 3?
Confirm your account has permission to access Administrative Options, Custom Features, and Custom Fields. Also confirm the tab is not set to Hidden.
Why can’t I activate a control?
The control may already be active on another custom tab. Review the warning, confirm the existing location, and move it only when intended.
Why is the tab visible but users cannot edit it?
Check whether the Data Entry Mode is Read Only and review the user permissions associated with the control.
Why does a ComboBox have no choices?
Open the control in Custom Control Setup, click Edit Values, and add or activate the intended values.
Related CAREWare guides and resources
|
Resource |
Description |
|
Manage ComboBox choices, including adding, editing, activating, and deactivating values. |
|
|
Use active custom client fields in import and export templates. |
|
|
Refresh the custom field list when new or changed fields are not displayed. |
|
|
Search for clients using standard identifiers and configured custom fields. |
|
|
Prepare templates and import data into active custom fields. |
|
|
Instructions for adding custom controls to the list |
|
|
Manage User Groups |
Update user permissions by group |
|
Add services for multiple clients at once |


