


|
Purpose |
Configure CAREWare to authenticate users through a SAML 2.0 identity provider (IdP) for single sign-on. |
|
Who should do this |
CAREWare administrators working with the organization’s identity-management or security administrator. |
|
Use this setup when |
CAREWare users should authenticate through an external SAML identity provider such as Okta. |
|
Main warning |
Test with a non-production or emergency-access account before enforcing external authentication. Incorrect SSO settings can prevent normal CAREWare sign-in. |
|
Video walkthrough |
Quick path
|
Administrative Options > Advanced Security Options > External Login Provider Settings (OIDC and SAML) |
Before you begin
• Confirm the public CAREWare HTTP Server Base URL that users will use for SSO. Use HTTPS/TLS for internet-facing CAREWare.
• Coordinate the CAREWare Service Provider values with the identity-provider administrator before enabling SAML.
• Create or confirm each CAREWare user in Provider User Manager and make sure the value returned by the IdP can be matched to that user.
• Keep a documented recovery method available before changing authentication settings.
|
Important |
|
Warning |
Enable external login providers
Step 1. Log into Central Administration and click Administrative Options.
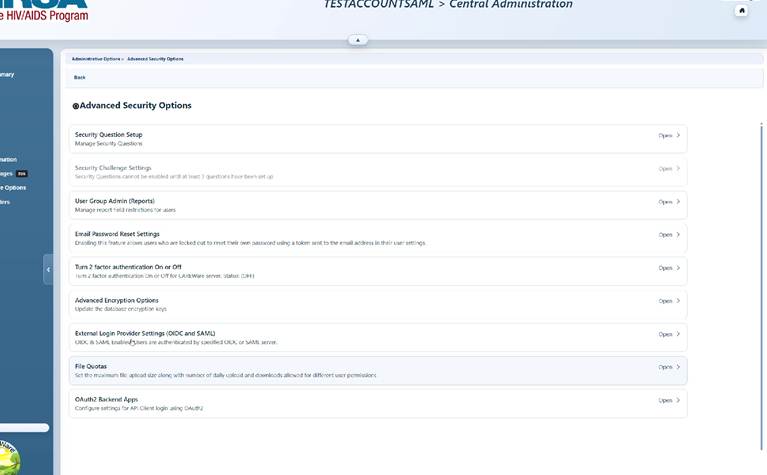
Step 2. Click Advanced Security Options.
Step 3. Open External Login Provider Settings (OIDC and SAML).
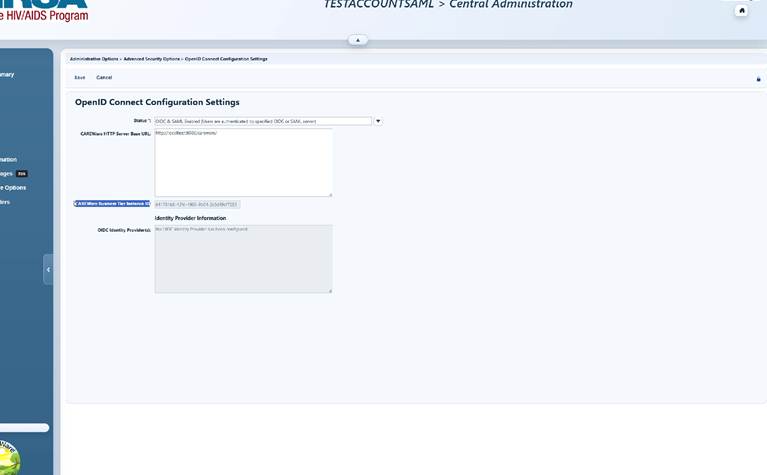
Step 4. Click Edit. Set Status to OIDC & SAML Enabled.
Step 5. Enter the CAREWare HTTP Server Base URL used by users, then click Save.
Add the SAML identity provider
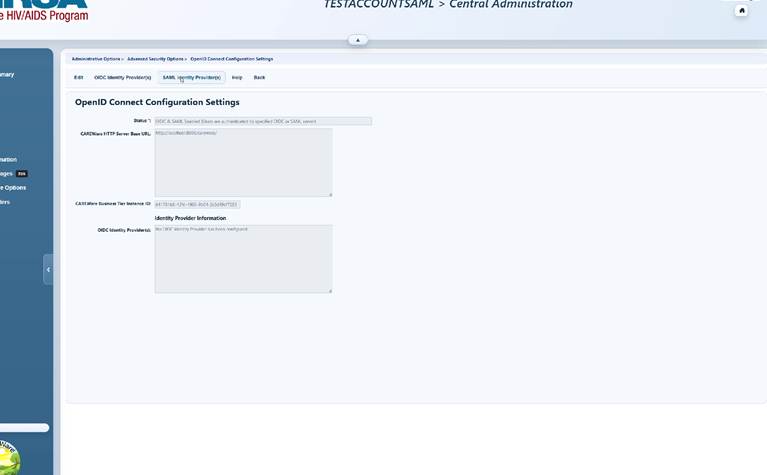
Step 6. From External Login Provider Settings, click SAML Identity Provider(s).
Step 7. Add or edit the SAML provider and enter the values supplied by the identity provider.
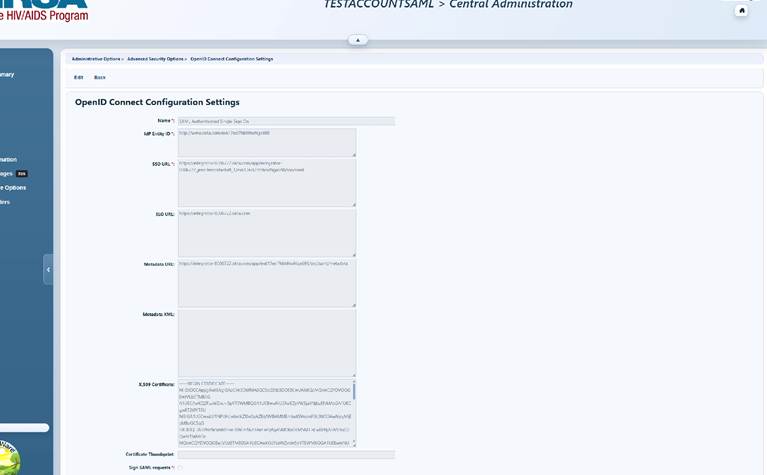
SAML provider settings
|
Setting |
Use |
|
Name |
A recognizable name for the SAML identity provider. |
|
IdP Entity ID |
The identity provider issuer/entity identifier. |
|
SSO URL |
The identity provider single sign-on endpoint. |
|
SLO URL |
Optional single logout endpoint when supported. |
|
Metadata URL / Metadata XML |
Identity-provider metadata used to establish the SAML trust. |
|
X.509 Certificate / Certificate Thumbprint |
Certificate information used to validate signed SAML content. |
|
Sign SAML requests |
Use when the identity provider requires signed authentication requests. |
|
Require signed SAML content |
Use when CAREWare should require signed SAML responses/assertions. |
|
Match 'name' attribute |
Matches the SAML name value to a CAREWare user. |
|
Match 'name' attribute on usr_saml_alias field |
Matches the SAML name value to the CAREWare user SAML alias instead of the CAREWare username. |
|
Match 'email' attribute |
Matches the SAML email value to the CAREWare user email address. |
|
Use front-channel logout |
Enables browser-based SAML logout behavior when supported by the IdP. |
|
Tip |
|
Warning |
Configure Okta as the SAML provider
For Okta, create a custom SAML 2.0 application and use the CAREWare Service Provider values for the application settings.
Step 8. In Okta Admin Console, go to Applications > Applications > Create App Integration, choose SAML 2.0, and name the application.
Step 9. Set the Single Sign-On URL to the CAREWare Assertion Consumer Service (ACS) URL and the Audience URI to the CAREWare Service Provider Entity ID.
Step 10. Set Name ID format and Application username to match the identifier CAREWare will use for user matching. Add attribute statements only when required for the CAREWare mapping.
Step 11. Finish the Okta app, assign a test user or group, then retrieve the IdP metadata from the Sign On tab.
Step 12. Enter the Okta IdP Entity ID, SSO URL, metadata, and signing certificate in the CAREWare SAML provider record, then save.
|
Important |
Okta-to-CAREWare mapping
|
Okta |
CAREWare |
|
Single sign-on URL |
CAREWare ACS URL |
|
Audience URI (SP Entity ID) |
CAREWare Service Provider Entity ID |
|
Identity Provider Issuer |
IdP Entity ID |
|
Identity Provider Single Sign-On URL |
SSO URL |
|
IdP metadata / X.509 certificate |
Metadata URL/XML and X.509 Certificate |
Prepare CAREWare user accounts
Step 13. Open Administrative Options > Provider User Manager > Manage Users.
Step 14. Select the user and click Manage.
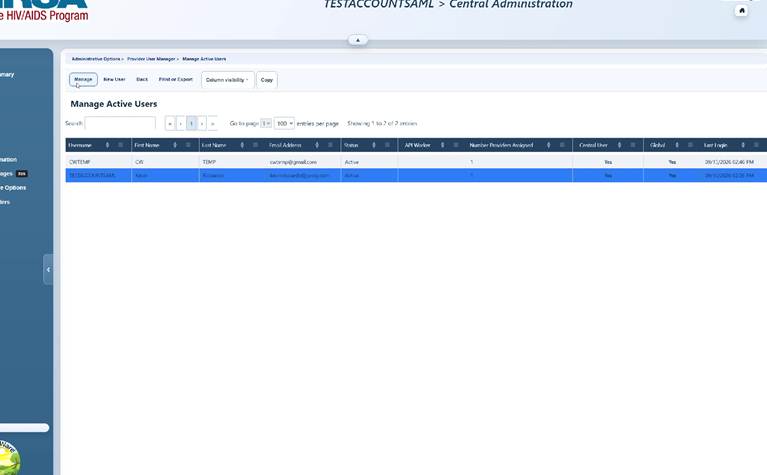
Step 15. Confirm the CAREWare username, email address, or SAML alias matches the SAML attribute selected in the provider configuration.
Step 16. Confirm the user is assigned to the required provider(s) and user group(s).
|
Tip |
Apply server-side changes safely
• Run CW Admin Utility as Administrator. jProg documents the default location as C:\Program Files\CAREWare Business Tier.
• If a setting indicates that a restart is required, the setting needs to be edited using the CW Admin Utility where a restart of the CAREWare Business Tier can occur before editing the setting.
• Common Storage Values can be reviewed at Administrative Options > Server Management > Common Storage Values. Change authentication-related values only when the guide or CAREWare Help Desk specifically directs you to do so.
Test and verify SAML authentication
Step 17. Use an assigned test account to start the CAREWare sign-in flow and authenticate with the SAML identity provider.
Step 18. Confirm CAREWare maps the identity to the intended CAREWare user and opens only the providers and functions already assigned to that account.
Step 19. Test logout and a second sign-in. If SLO or front-channel logout is enabled, confirm the behavior with the identity provider.
Step 20. After successful testing, repeat with representative user roles before broad deployment.
Troubleshooting and common questions
|
Question |
Guidance |
|
The user authenticates at the IdP but CAREWare does not open. |
Verify the SAML matching option and confirm the returned name/email value exactly matches the CAREWare username, email, or SAML alias. |
|
Okta rejects the SAML request or response. |
Recheck the CAREWare ACS URL, Service Provider Entity ID, IdP Entity ID, SSO URL, certificate, signing requirements, and Name ID configuration. |
|
A user signs in but cannot access a provider. |
Use Provider User Manager to verify provider assignment and permissions. Authentication and authorization are separate. |
|
A setting changed but behavior did not. |
Check whether the setting requires a CAREWare Business Tier or HTTP Server restart, then retest during a maintenance window. |
|
Normal CAREWare login is unavailable after enabling SSO. |
Use the documented administrative recovery process for the installed CAREWare build. Do not improvise common-storage keys; contact the CAREWare Help Desk if the SAML recovery value is not documented. |
Related CAREWare guides and resources
|
Resource |
How it helps |
|
Run and manage Business Tier server settings. |
|
|
Manage CAREWare users, providers, and permissions. |
|
|
Create users and assign providers and permission groups. |
|
|
Reference shared external-login concepts such as matching, restarts, and recovery. |
|
|
Configure the CAREWare HTTP Server and TLS for secure browser access. |
|
|
Review server-level settings; change authentication values only when specifically documented. |
|
|
Create the SAML 2.0 application, assign users, and retrieve IdP metadata. |


