

Cap on Charges

|
|
|
|
|
|
|
|
|
|
|
|
Quick paths
Central Administration > Administrative Options > Cap On Charges setup
Client record > Annual Review / Annual Data > Poverty Level Assessments
Client record > Cap On Charges > Annual Cap On Charges Summary / Cap On Charges Ledger
Client record > Services > service record > Receipts
Activate Cap on Charges
Step 1. Sign in to Central Administration and open Administrative Options.
Step 2. Select Cap On Charges setup. Check Activate and click Save.
|
Important: This is a system-wide feature; it cannot be enabled for selected providers only. |
Configure access and permissions
Step 3. In Central Administration, open Administrative Options > Provider User Manager. Select Manage User Groups or Manage Users.
Step 4. Open the appropriate group or user, choose Change Permissions / Manage Permissions, and search for Cap on Charges or the relevant client-data permission.
Step 5. Grant only the available view or edit permissions required by the role, then verify provider access. Test with a non-administrator account.
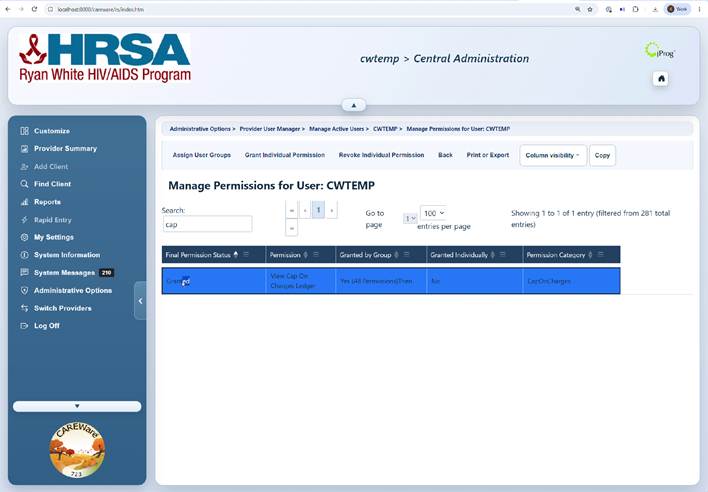
|
Tip: Provider-level permissions must allow the action before user-group permissions can provide access. Exact permission labels vary by CAREWare build. |
Open the client tabs
Step 6. Switch to the appropriate provider. Select Find Client, search for the client, and open the client record.
Step 7. Open Annual Review / Annual Data to access Poverty Level Assessments; open Cap On Charges to access its Summary and Ledger. Open Services for receipt entries.
Poverty Level Assessment
Step 8. Select the calendar year in Annual Data, then open Poverty Level Assessments and click Add or Edit.
Step 9. Enter the assessment date, household size, household income, and Individual Income; click Save.
Step 10. Verify the displayed FPL percentage and annual cap for the correct calendar year. Use individual income, not household income, to calculate the cap.
Cap on Charges Ledger
Step 11. In the client record, open Cap On Charges > Cap On Charges Ledger.
Step 12. Click Add. Enter the receipt date, amount paid, and a short description of the qualifying out-of-pocket expense; save.
Step 13. Review the ledger date, amount, provider, and Service Receipt indicator. Open Annual Cap On Charges Summary to review Annual Cap, Total Paid, and Difference.
Important: Do not enter the same payment twice as a direct ledger charge and a service receipt.
Services and service receipts
Step 14. Open Services, add a service or select an existing service for the applicable year, and open its Receipts section.
Step 15. Add or edit the receipt. Enter Receipt Date, Amount, and Source; check Out of Pocket Expense, then Save.
Step 16. Return to Cap On Charges Ledger and confirm the receipt appears with the Service Receipt indicator.
Annual cap reference
|
Individual FPL |
Maximum out-of-pocket share of individual income |
|
Under 101% |
No out-of-pocket expenses |
|
101%–200% |
5% |
|
201%–300% |
7% |
|
Over 300% |
10% |
Important: These thresholds are shown in the supplied CAREWare August 2020 reference. Confirm current program policy and applicable poverty guidelines before applying them.
Troubleshooting and useful tips
- Missing Cap on Charges tab: Confirm activation, provider access, and the user’s effective permissions.
- Missing annual cap: Confirm the correct year and a saved Individual Income in Poverty Level Assessments.
- Missing service payment: Confirm that Out of Pocket Expense was selected on the receipt.
- Networked CAREWare may include payments from multiple providers.
Related CAREWare guides
|
Guide Link |
Description |
|
Learn how to create, edit, and configure permission settings for provider user groups. |
|
|
Learn how to add, manage, and assign individual user access and permissions across providers. |
|
|
Instructions for calculating Federal Poverty Level |
|
|
Instructions for entering services delivered to clients |


