


|
Purpose |
Activate and manage controls on the Central Custom Tab, then enter or update those values in client records. |
|
Who should do this |
CAREWare administrators, data managers, or designated support staff with access to Central Administration and Custom Fields. |
|
Use this setup when |
A central custom field must be activated, reordered, exposed in Find Client or Rapid Entry, or validated on a client record. |
|
Main warning |
Make changes in the intended Central Administration environment. Do not repurpose a control after it contains production data. |
|
Video walkthrough |
Quick path
|
Administrative Options > Custom Features > Custom Fields > Central Custom Tab |
Before you begin
● Work in Central Administration and verify the top banner before making changes.
● The custom control definition must already exist in Custom Control Setup.
● Decide the field order and whether the field should be available in Find Client or Service Rapid Entry.
● Use a test or non-production client record when available.
|
Important Central Custom Tab controls are data elements that can be entered and edited in Central Administration. Client level data is typically only added or edited in providers. The Central Custom Tab is an option to record data in Central Administration for Central or State level staff to access. |
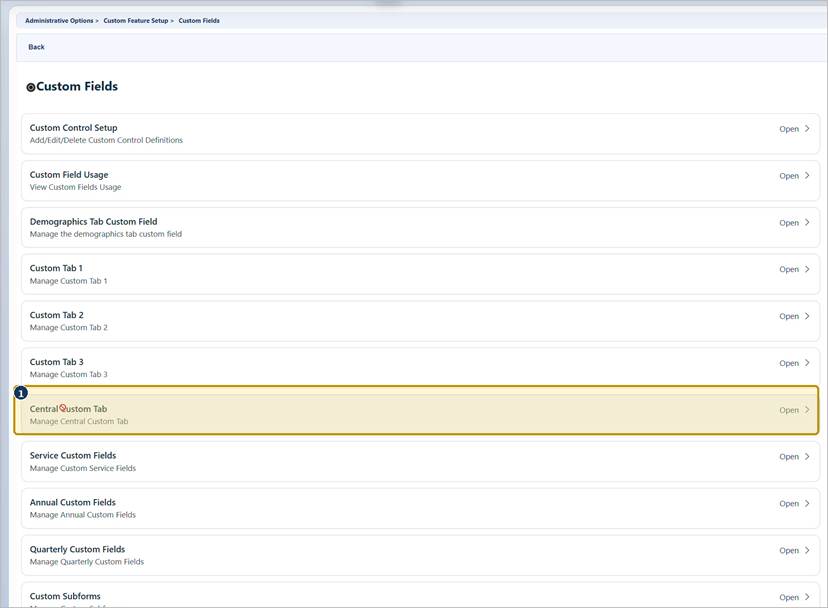
Open Central Custom Tab
Step 1. Click Administrative Options.
Step 2. Click Custom Features.
Step 3. Click Custom Fields.
Step 4. Click Central Custom Tab.
Activate a custom control
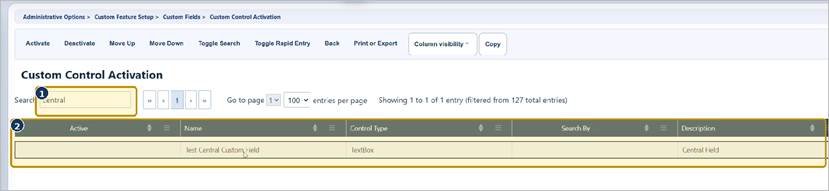
Step 5. Enter part of the control name or description in Search.
Step 6. Select the control.
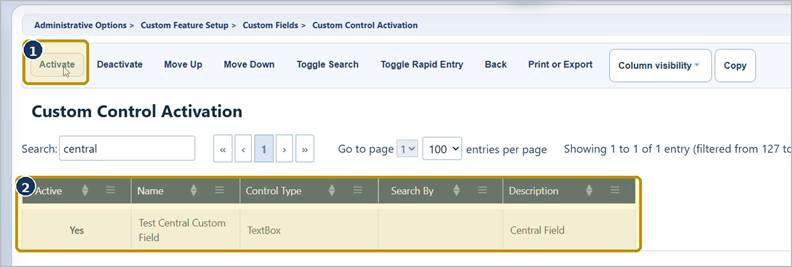
Step 7. Click Activate. Confirm Active displays Yes.
|
Important Activate only a control whose definition and business meaning have been reviewed. Do not reuse an existing control for a different question after it contains data. |
Arrange and configure the field
Step 8. Select an active control and click Move Up or Move Down until it is in the preferred order.
Step 9. Use Toggle Search only when staff should search for clients by this value.
Step 10. Use Toggle Rapid Entry only when the field is needed during Rapid Entry.
|
Tip Keep the Central Custom Tab focused. Activate only the fields needed for the workflow, and group related fields in a logical order. |
Custom Control Activation buttons
|
Button |
What it does |
When to use it |
|
Activate |
Adds the selected control to the Central Custom Tab. |
Use after confirming the correct control and purpose. |
|
Deactivate |
Removes the control from the tab without deleting its definition. |
Use when the field should no longer be displayed. |
|
Move Up / Move Down |
Changes the order of active controls. |
Place related fields in a logical entry sequence. |
|
Toggle Search |
Shows or hides the field as a Find Client search option. |
Use only for reliable search criteria. |
|
Toggle Rapid Entry |
Shows or hides the field in Rapid Entry. |
Limit Rapid Entry to fields needed in that workflow. |
|
Back |
Returns to the Custom Fields menu. |
Use after reviewing the active fields. |
|
Print or Export |
Opens print and export options for the grid. |
Use for review or change documentation. |
Open a client record
Step 11. Click Find Client.
Step 12. Enter at least one search term, then click Client Search.
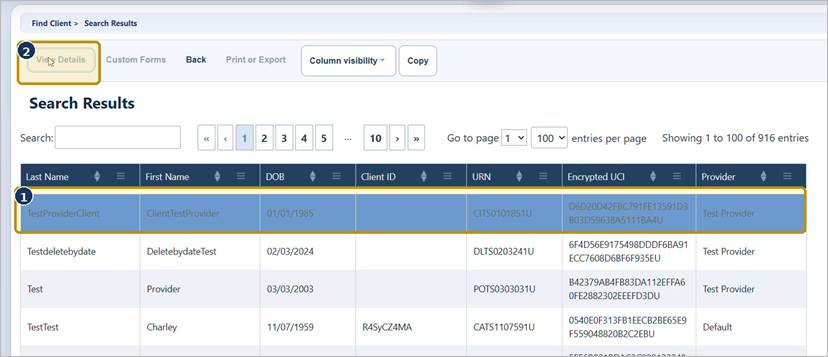
Step 13. Select the client, then click View Details.
Open the client Central Custom Tab
Step 14. Click Demographics.
Step 15. Scroll to Custom Data.
Step 16. Click Central Custom Tab.
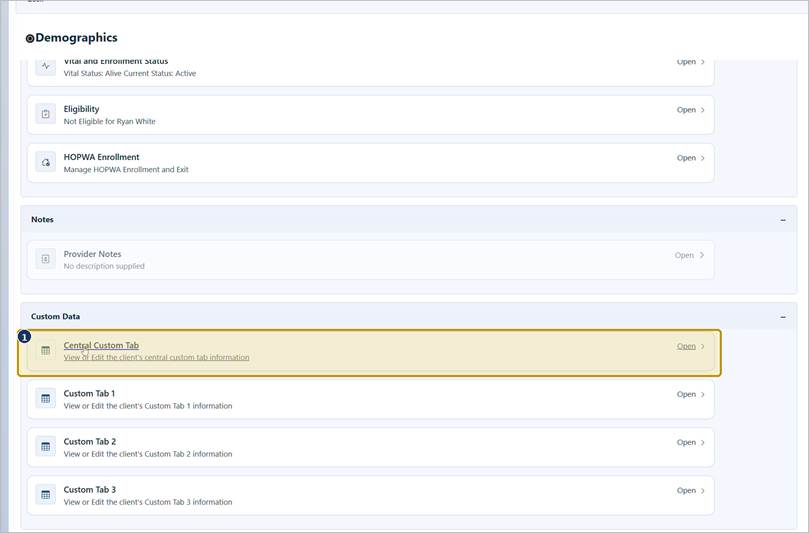
Enter or update central custom data
Step 17. Enter or select the applicable values.
Step 18. Click Save.
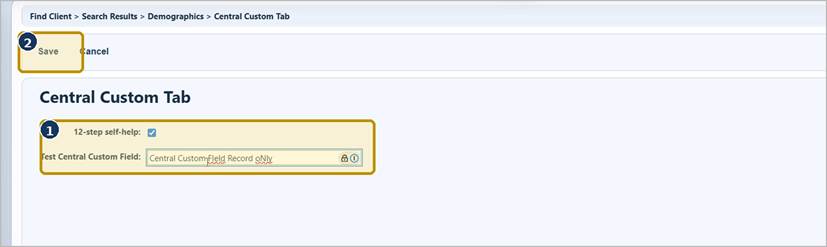
|
Important Use a test record to confirm the control type, required behavior, default value, length limit, and edit permissions before production use. |
Deactivate a field
Step 19. Return to Central Custom Tab setup, select the active control, and click Deactivate.
|
Important Deactivating a control removes it from the Central Custom Tab but does not delete the control definition or previously stored data. Review reports, imports, exports, templates, and staff workflows before changing an existing control. |
How to confirm it worked
● The control displays Active = Yes in Custom Control Activation.
● The field appears under Demographics > Custom Data > Central Custom Tab.
● A test value can be entered and saved by an authorized user.
● The field appears in Find Client only when Toggle Search is enabled.
Helpful data-quality tips
● Use a ComboBox for standardized values that must be counted, grouped, or reported consistently.
● Use a DatePicker for dates so CAREWare can enforce a valid date format.
● Keep identifiers, ZIP codes, and phone numbers as text when leading zeros or punctuation must be preserved.
● Use a Memo for longer narrative notes, not information that must be grouped or counted.
● Use default values sparingly; a blank value is safer than an incorrect value accepted without review.
● For a ComboBox value already used in client data, deactivate the value instead of deleting it.
● Use Toggle Edit by Permission for controlled data and test each applicable user role.
|
Important Changes that seem cosmetic, including renaming a field or ComboBox value, can affect training materials, reports, import templates, exports, and staff workflows. Coordinate and test changes before release. |
Troubleshooting and common questions
Why can’t I see the Central Custom Tab?
Confirm that the account can access Administrative Options, Custom Features, and Custom Fields. Ask a local administrator to review permissions.
Why does an active field not appear on the client record?
Verify that Active displays Yes, refresh the client record, confirm the user can access the selected client, and test with another authorized account.
Why can’t a user edit the field?
Review Toggle Edit by Permission and the user’s permission assignments in Provider User Manager.
Why does a ComboBox have no choices?
Open the control in Custom Control Setup, click Edit Values, and add or activate the intended values.
Related CAREWare guides and resources
|
Resource |
How it helps |
|
Create and maintain control definitions before activation. |
|
|
Configure provider-specific Custom Tab 1, 2, or 3. |
|
|
Locate a client and open the selected record. |
|
|
Review the workflow before enabling Toggle Rapid Entry. |
|
|
Review where custom fields are active and used. |
|
|
Manage ComboBox choices and active values. |
|
|
Refresh the list when a new or changed control is not displayed. |
|
|
Use active custom fields in import and export templates. |
|
|
Review or adjust user permissions. |


